Monday, October 28, 2019

I had an idea...

When I get an idea, it is not always complete, just something that needs to work its way out of my brain.  I do however jump right in and work my way through it - however long it takes or until I know it is just not possible.  More often than not, it works, but just takes a while and the process can be daunting.

This one was no different.  I wanted to work large, on a small surface.  What? It can be done, in my mind anyways.  I took six 5x7" Fredrix Artist Canvas Panels and taped them together using a good quality tape.  The large panel was now a 15x14".

I started the process using two Lyra Color Giants pencils in Black and Grey to doodle a rough sketch I thought might work.  Note I was trying to keep the connection of the panels by overlapping the circles to join the canvases.

Next was time to start added colors.  I belong to a color based art program called Experience True Colors (ETC) and this months theme was called The Great Unknown (kind of fitting wasn't it) and the palette was one I was really enjoying to work with.
Like anything I do, especially in regards to art, I don't follow rules well - I use them as inspiration.  Now don't get me wrong,  ETC doesn't have rules when it comes to your interpretation on the monthly palettes, which is perfect for me and I of course take full advantage of it.


I added a few drops of FW Acrylic Artist Inks in Process Magenta and Flesh Tint. Let them sit for about a minute then sprayed them liberally with water and again allowed them to sit for about 2 minutes.  Then I took a rag and started to blot them.
I then allowed them to fully dry at this point.  I pulled out my large range of Grey acrylic paints and began added them to the now dry surface.  I mixed the greys as I applied them. I got on a roll at this point and needless to say, taking photos were not even on my radar.

Hence why we are now at this point.  I used six or seven different grey hues from five different companies - Golden (fluid and high flow), Liquitex, DecoArt Media, Grumbacher and Martha Stewart. Knowing it needed a color now, I brought out my Shiva Artist's Paintstik (Oil).  I used White, Azo Orange and Yellow Ochre.
Blending the colors with my finger, the idea was there, but the color was not and I knew that this was not the result I wanted.  Time to walk away for a bit.

Came back a few hours later with fresh eyes to fix the colors. I once again pulled my Paintstiks and this time used the White, Napthol Red and Yellow Ochre.
It was getting there, but still not happy. Had a bit of a meltdown, and started applying Light Modeling Paste and Sand Paste for texture I guess, as like I said, I was having a hissy fit.  So needless to say, it was yet again time for a break (seeing a pattern here, right).
I came back with fresh eyes the next day, dry surface  to work on. Still suck on the greys, I began adding it is various hues/values thickly over the textured surface.

Now it was time to add some color - I thought I'd try some green....

Ya, no.  No mater what I did at this point, it just wasn't what I wanted.  I didn't know that yet, but I knew it was time to walk away again or it would end up in the garbage. Tomorrow is another day!

Tomorrow it is...

I came in with an idea to bring it all together...

Or so I thought.  This is the piece just before I had yet another hissy fit.  Underneath all this, I had added so many layers trying new colors.  I think I was really hung up on staying with the ETC color palette and it just wasn't working for me at this point.  I pulled out Turquios (Phthalo) and Titanium White with a mission to fix this hot mess. I really liked the left side, but still now happy with the right.  I did a wash over the base to push back the colors in hope that would help. Nope.
My next attempt was pulling out a stencil and trying to push the background back even further.
If you follow along on Instagram, you will have seen a few of these images along the way.  The one thing that I found so interesting was the feedback I got along the way.  Everyone was loving the images and couldn't understand why I wasn't liking it.  It took me that night to figure it out.  It was too much like an art journal page and not a painting.  I know I am by no means an accredited artist, but I am an educated one. Yes, self taught and continuing to educate my self on a daily basis. I know what I like and what I don't. I knew I didn't like this.  So day four was going to be my break through....

I started out day four with adding some torn pieces of Tim Holtz Tissue Paper (Postale) again overlapping the pieces so that there would be some on all of the six panels. Think I would be happy now? Nope. 
I took some Titanium White and Acrylic Glazing Liquid as I wanted the collage elements to be pushed back again (when will I learn)?!
I once again, wiped back the white so it was not so bright and got the grunge I thought I wanted.
I of course new with wasn't going to be the end, it needed more. I pulled out some deli paper and did a few rough paint doodles on them and just put them on the painting to dry to see if it was what I wanted, and of course walked away yet again.

Day five was now upon me and I was not going to lose to this panel. I had an idea and thought it through and boy, it may have took a while, but I love the results.

I started the day off with mixing up some Bone Black and Turquois (Phthalo) and some abstract shapes to create a focal point.  I knew I wanted that Turquois to peak through. I also added some sgraffito through a couple areas.
I wanted to see how the deli paper circles would work so I cut a couple out to see.
Sorry for the glare, but at this point I was just trying to see what would work here.  I knew pretty quick it was only going to be the one.

I also added some line drawings in grey to keep the panels joint once they were separated.

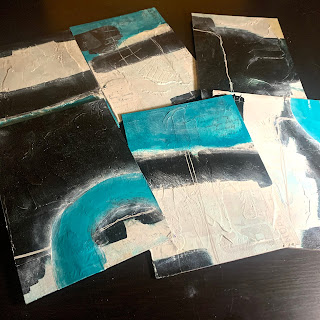
It was finally coming together.  Now was the time to cut them apart to see if it worked.
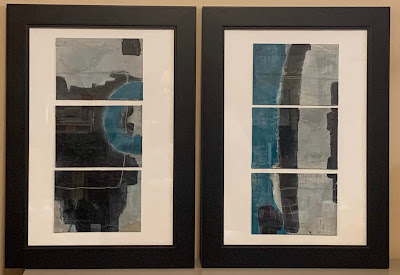
Now comes the fun part.  My idea on working large on small.  It can be done....see!? What if...once part, you frame separately or together and arrange how you want, when you want.  If I was to frame individually, I could change the layout whenever I wanted. I knew I wanted it in two frames. How I wanted to to be presented was to be determined.


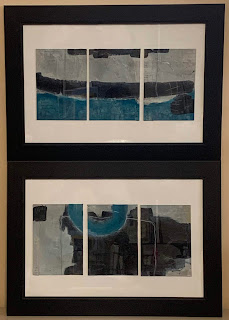
Here is just a sampling of the ways these could be hung. Whether you choose vertically like above or horizontally...


The possibilities are endless. I have them currently mounted in two 12x18" frames.  Not sure yet if this is how they will end....time will tell.

Thanks for sticking it out with this long post.  I will see you again soon...in the mean time, be sure to check me out over on Instagram and Facebook by searching @w2studioarts.  Have a great day!


Tuesday, October 22, 2019

A Painted Collage

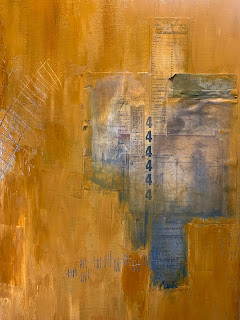
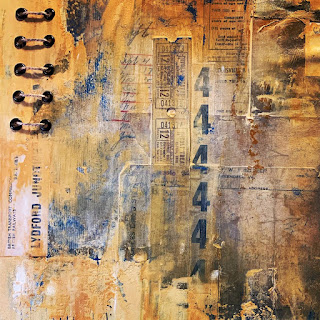
This is a format that I continue to work on. It is much harder than it looks.  I try hard to showcase the vintage ephemera that I apply, yet provide a balance for the painting to still shine.  It is hard.  I am a long way from perfecting, but I will continue to work at obtaining that balance I seek.

It usually starts with a basic idea on how I want the paint or collage to begin.  In this case, I had the idea of wanting to apply the collage on top of the blended base.  I dug back a ways on a class I took from Julie Prichard called Layer Love V2.0 where one of the lessons showed how to work with Fluid Acrylics and Open Medium to get maximum blend ability.  I have really been hung up on yellows for quite some time so wanted to try once again using it in a triad. 

I pulled Raw Sienna, Burnt Sienna and Payne's Gray (along with my neutrals Titan Buff and Titanium White). Raw Sienna tends to the dark the dark side, so I mixed with the Titanium White then with Titan Buff, simply looking for the perfect hue.  Each time, I am adding Open Medium with the paints and applying to one side of the canvas. 

I then repeated on the opposite half this time using Payne's Gray. 


I next tried adding the Burnt Sienna.  As amazing as it looked , it was simply not what I was after for this piece.  The white you are seeing in the photo below is not white paint, but rather the open medium, it does dry clear so I was not worried about it at all.  There are many pros and cons to working with open mediums where I live - it is not very dry, nor hot, and therefore each layer usually takes a day to dry.


Once I was done my blending I added some 'sgraffito' marks in the wet paint using my trusty skewer hoping that it would give me a jump start.
After letting it dry overnight, I came in with fresh eyes.  I began applying some vintage paper ephemera in a collage format.
I knew pretty quick that the Burnt Sienna was not gonna stick around, but I was going to try to keep the yellow and blue in.
I once again added the two colors (blending with the open medium and neutrals).  It was getting there, but I knew it still was not what I was after.  It was too deep in the color hues and I felt the collage was getting lost.  I once again added more sgraffito marks and put it aside to dry over night.

Came back yet again and tried to include the Burnt Sienna - I believe this is where I finally decided to put that bottle away.

I brought the Payne's Gray back, but mixed it heavily with the Titanium White and added lots (too many) sgraffito marks. Used a lot of baby wipes and deli paper to pull back and move the blue - frustration was definitely setting in.


Time for it to be put away for the day once again.  There was a lot of paint on here.

I came back this day with an idea. I first added some more collage elements as some of my key shape areas were getting lost in the paint. I then pulled out something I probably haven't used in close to a year - Modeling Paste!  I mixed the Raw Sienna with the Modeling Paste and with a heavy hand, applied it to the canvas with my palette knife.  The big thing I took into account as I was mixing the two, is simply to not over mix it.  I used Light Modeling Paste and as it has the consistency of Buttercream icing, I find if you mix it too much you simply mix out the air (it deflates) I wanted it to be light and streaky. And you know what...it worked.

I once again added more sgraffitio marks, basically in the same areas as before as they had been covered with the new layers. I also wanted the blue below to pop through.  I was heavy handed in areas and then light in others. I also used my palette knife when needed to smooth over areas that were too rough.


You will note that there are different color variations on the photos, that is usually due to the time of day and/or if I had the light shinning on the canvas.

It was not time for it to dry and it was going to take more than a day!  Good thing we were headed out on a mini vacay to see family!

Back with fresh eyes and another idea I started to plan it out.  I knew I wanted to stitch on it, but wasn't sure if I wanted a twill, embroidery thread or jute.  As I was looking for my jute, I saw some brads...idea!

Now did I have the guts to do it?
Does that answer your question?  I took the time to measure them out and very happy with the results!

I decided on a simple loop lace up and really like the simplicity of it and of course the lines.

Currently it is sitting up on my desk waiting to be vanished, which I should probably do soon before I decide to add to it and change it totally! But for now, I'll move onto my next piece.

18x24x1"canvas
collage elements purchased from: PaperHarborCo, MadFoxStudio, SalvagenationVintageVanessaPope and RubyDogArt
All can be found on Etsy & Instagram

Monday, October 14, 2019

The Journey Continues...

...the junk journal journey that is!  I have been having a blast creating these jump start junk journals, using lots of the vintage papers I have purchased. Over this holiday weekend, I created two more. One is more or less done as far as the 'jumpstart' factor, the other simple just needs to be stitched into the cover.

Here is the 'ready to be junked' one:


  I pulled out a couple of my bundle purchases from Suzy at PaperHarborCo as I wanted to use them to actually create the base of the journal.  The first thing I did was pull all the papers out and apart and sorted them into similar sizes.
When I stack, I take into account the direction as well as size of the papers - I definitely like to mix it up. My papers are stacked in an organized yet random pattern. If a paper is too long, I simply offset the centre to accommodate for a folded flap that can be manipulated later.

Today I decided to make my cover 'fit' the subject matter.  I don't often do it this way, but since I had it, thought it only fitting!

I created three signatures for this journal, it fit perfectly.

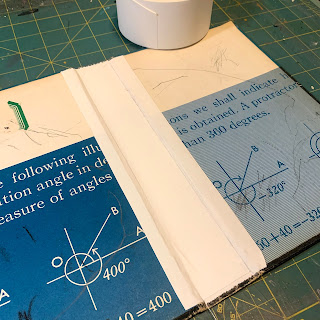
Once I gutted it, I secured the spine with book tape - overlapping it in the centre for extra security before stitching.
Now it was time to get to the mathematics of formatting the template for hole placement & stitching. I usually create a template the length and width of the spine.  I measure out the vertical and horizontal lines. For the vertical lines, you need to take into account the number of signatures to be used and centre accordingly.  As for the horizontal lines, I always measure in one inch from the top and then one inch from the bottom for my starting points.  From there, I measure the centre between those then the centre from the top to centre and bottom to centre - clear as mud, right?!
There the lines cross are your future stitching points and need to be punched out.  I use an awl and a foam pad. The pad is simply to protect my mat underneath.  You can also use an old phone book or the guts from your book if you are not going to use them in another project.
A few things to note on the photo below - 
1. mark your template with top and bottom. It makes a difference when you go to punch your signatures.
2. mark your signatures with pencil so you can line up your template. 
3. you can see that the template is longer than signature, I centre it on the signature and make my pencil marks
Now start punching.  As this is the first signature, you need to punch through the signature from the centre fold
Now it it time to start stitching. I use the basic five stitch which is very simple to do.  You can find the how to anywhere on the internet. The photo below actually shows me adding the second signature - this is where it shows the importance  lining up your holes.  One thing I will say is that I use way more cord than one probably should, but it is because I wan the tight stitching and to do that, I need to be able to see where my needle is going....preferably into the right hole!

This next photo show how it looks before you complete the full five stitching, it is a very important part.  There is thread at the top and bottom, and you need to pull the two threads away from the book - pull up and pull down all while keeping your hands and threads lateral to your book back.
There she be, all three signatures in and secured.
Here is a little peek inside, you can see the layers and folds...
...and look at all the goodies that are ready to be added when the time decides!

I also started work on this one...

It has four signatures - each one a little different.  One all blank ledger sheets, one all written on vintage ledger sheets, one mixed ledger sheets and one mixed office papers.

I have my book gutted, template all measured out and ready to punch the holes through the signatures.  then all I have to do is stitch them into the book.  The one thing I did differently this time around, aside from four signatures, is I glued on vintage ledge pages to the inside covers.  They look awesome!

Thanks for popping in. Hope you enjoyed seeing my process, be sure to leave a comment with any questions and hop on over to Instagram or Facebook (@w2studioarts) to follow along where I tend to post more regularly.


That Other Neutral Triptych

  That Other Neutral Triptych wrapped canvases 10x10x1.5" (x3) professional grade artist materials I worked on this smaller series at ...