Saturday April 30...
Again, we were there by 9:30 all set and ready to play, learn and be inspired!
So this is what happens when you have your bestie take control of the camera, "Oh, let me take the picture for you!"


Well at least she did get a great shot of Donna & I (thanks gf)!

Once all the shenanigans were done, we had some time to play and finish up a few items from the previous day.
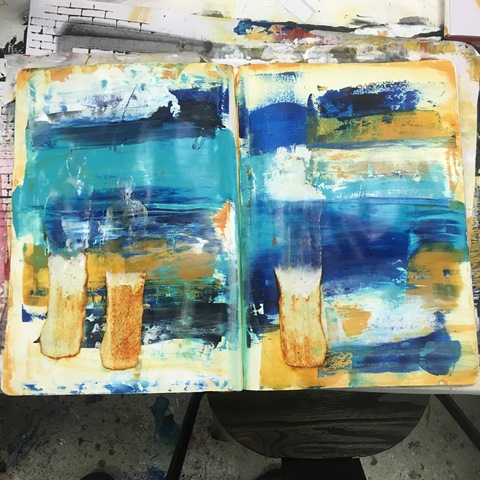
Here I finally got around to adhering my skins to my page. The base page was one of the ones in the journal I brought and had prepped with a mix of Heavy Body and Open Acrylics. I adhered them using Golden's Regular Gel Medium (Matte), once dried (kinda), I wanted to glaze them and the page. I was struggling with a color choice for it so asked Donna and what color does she say....ya, you guessed it...Quinacridone Nickel Azo Gold! I doubted her, pulled out some other colors. What did I do you ask...


Ya, Donna was right!


Here is the page as it stands now. I know I want to do more, just need some time to do it!
Now it was time to be introduced to Watercolors. Were told of the different kinds, applications and of course what surface prep was needed and what surface should be used.
Here is one I worked on using some of her suggested (and favorite) Daniel Smith. I kept to the pastel colors on one side and bright vivid on the other side. I used a very wet brush and a good amount of water. Whether it was applied by a brush or a spray bottle, it was fun.


Going off previous classes and teachings, I decided to create a focal point and make the image into something. I saw a flower pod, and went from there. I framed it out using Titanium White paint then used the Stabilo Woody in Black to draw in the 'frame'.


The page was really doing nothing for me, so I thought I would try the peeled paint effect using Dorland Wax over the image I wanted to save. Having done this, I know now that there were a few steps I could have improved on (sealing the image first), allowing it to dry more...but hey, it was a learning experience and I am okay with that.
I did the same on the other side, but this time I simply framed out the areas I wanted and then applied the Dorlands Wax them and painted over the entire page with Mars Black paint. Allowed it to dry (too) slightly, then started to scrub it off. It was very dark, so applied a coat of white doing the same technique.


Do really like the streaked effect on this one I must say.

It was time for a lunch break now...
Guess I should have said earlier, Donna's Mom makes all the meals there and they are fab-u-lous!! She's Italian...need I say more?!
After lunch, be started into Pastels. This is the one I was dreading the most...Pan Pastels were coming out!

For those that know me or have been following me for a while, know these are my least favorite medium out there. Really not sure why, but I will say I did have an 'aha' moment! As Donna was explaining the story behind Pan Pastels, I found my self wondering (looking around) the room and caught sight of an art piece behind me...assuming it was a painting. WRONG! No sooner was I having a brain wave for this product....did I find out all the images on that large shelf were - yup, you guessed it...Pan Pastels!!
So I dutifully apply the pan pastels on my prepped surface as required, following along with the color palette of the image supplied. Oh, I really should back track for a quick second. There are a few different things you can use to prep a page for Pan Pastels - Acrylic Ground for Pastels, Colourfix Primer or simply using a Pastelbord. Colourfix Primer is so cool! That is what I chose to use as my base. Colourfix Primer is an already tinted acrylic ground for pastel. My page was a mix of the rust and brown colors Donna had available. There are many videos out there on pan pastels so go and watch, cause I am by no means a source to even ask.

So back to my aha moment...one of the (what I thought) paintings had caught my eye and right away I figured I was simply going to create a background with the pan pastels and make a silhouette in the foreground. It is not great, but for my first time...I'll take it.

This is the image that had caught my eye.

Next we went onto Oil Pastels. Donna work on one as she talked about the different kinds and which were her favorite. The thing that I must say - the process is so interesting and simple. How scribbles turn into frankly - art! One day I will get there too (I can dream)!


Then there is mine...
I tried to look at the sample once, flipped it over and went on my merry way...perhaps I should have looked at it some more! Oh well, it was fun and I will definitely attempt some more of this.

Here is my finished piece. Very interesting how some simple scratches in the crayons create a whole new level.

Once this was done. we had free time before and after supper to simply play. I tried a spread in my journal using Inktense Blocks. I wanted to try them on a gesso'd page.
I simply scribbled the blocks onto the page (one at a time, dried between applications). Touched up where I needed. I then free hand drew a branch across the page using a Fude Brush Pen.


Once it was set, I started scribbling in red berries/blossoms and blended with my wet finger.


That was it for Saturday. I am sure I have missed a ton of stuff, but guess that means you might just have to head to Huntersville North Carolina and take the class too! For now, I will sign off and be back soon with the final days events.
Thanks for stopping by...


No comments:
Post a Comment