Week #22
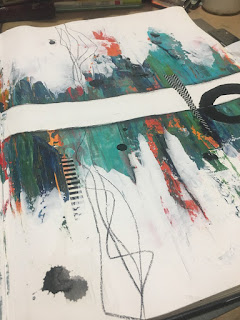
The base of the page is a boat load of rub ons. I did not gesso the page first. Once I had my rub ons down in the layout I was happy with, I did a white wash of gesso over top.
Once it was more or less dried, I went on with some acrylic paints. My apologies for the lack of photos here - was totally consumed and didn't take as many as I should have!
The basis here is once the paints are down, go in with Super Heavy Gesso and bring out the colors by taking back the colors...clear as mud right? Just think if the brunt of the page was covered in paint colors is becomes somewhat flat - if you add white to it, it tend to bring the colors forward and thus out!
The stripe along the middle is once again Super Heavy Gesso and was applied using a palette knife over painters tape to get the crisp line. Once the line was totally dry, I took a Liquitex Jumbo Paint Pen (you can simply use a paint brush and black paint) to create lines and circles. I also added some bits and pieces of washi tape to add more texture.
This took a good day to dry as I had a fairly thick layer on. Once it was dry, I used my Stabillo All Pencil in Black to create textural lines in the painting itself as well as shading across the linear line.
Week #23
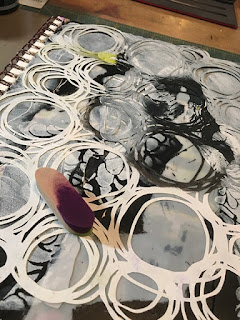
This one starts with spraying through 12x12" stencils and mark making. I of course did a couple things differently.
I used my Crafter's Workshop 4x4" Remnant Stencil Radar in which I actually applied black gesso through it using a sponge. I then kinda masked off a Dina Wakley Media Stencil Halves and sprayed black High Flow paint through it. My bottle is not in the greatest of shape so I had a fairly large amount come through. I simply picked up the stencil and placed it face down on the opposite page and patted it off with a rag. I then took a little of the gesso out and put on my craft mat, spritzed it with water. Took two different lids and stamped them into the gesso and created a pattern on the page.
Once dried, I used my palette knife and applied the following colors: DecoArt Media Fluid Acrylics Cobalt Teal Hue & Phthalo Blue. Then I used Golden Dairylide Yellow and finally DecoArt's Quinaquidone Magenta. The Magenta I kept in a fairly straight line across the middle then sprayed heavily with water to create the drips.
Once it was totally dried, I took my Krink (Teal) and scribbled with its' dauber top and squeezed extra hard at times to create the drips. If you do not have Krink, you could easily use a Liquitex Jumbo Paint Marker or even a paintbrush heavily loaded with paint. Just note this will all take a good amount of time to dry (probably over night).
Once it was dry, I once again pulled out the Super Heavy Gesso to apply similar as Week #22.
For the final step (for me) I glazed the page with Golden's Quinaquiodone Nickel Azo Gold and Glazing Liquid (Satin). If you do not have the Nickel Azo Gold, any burnt brown/orange will work just fine. Having said that, you could probably use any color you want! There are more steps I am sure, but I was more than happy at this point so have left it as is.
I was able to facetime with a friend and did a page that I really like - so many layers and so much fun!
Sadly I did not take photos of the first ten layers of this page! I literally puled out my bag of Dina Wakley Media Stencils and my massive bin of Dina Wakley Media Paints and started to play! I used bits of areas from the stencils and painted through them with a sponge. When I had a great base, I pulled out a mask Mod and sponged over it with Black Gesso. I wasn't upset when the gesso leaked underneath the mask - I really like the look.
You can see that I used my Liquitex Paint Markers over the black - I tried to use similar colors to the Dina paints. The nice thing with Gesso is that it dries fairly fast and works for me since we all know my patience level!
I added some Tangerine via the Alphabetic stencil.
Now it was time for yet another layer! I pulled out my Crafter's Workshop Stencil designed by Dina Wakley called Casey & Penelope (TCW355) and used the mask parts of the stencil. Laid them down and applied black gesso around them.
So when I pulled them off...awesome right?!
I then used my UniBall Signo White and traced on the dried black gesso to show off the shapes better. It wasn't as bright as I would have liked, so I ended up using my Fineline Applicator filled with High Flow Titinium White Paint. If you do not have High Flows, you can create your own by mixing equal parts of fluid acrylic paint and airbrush medium.
Yet more layers! I layered on one of my Stencil Girls Stencils by Traci Bautista and sponged over it with Titanium White paint.
It did not come out as good as I had hoped, so I wiped it off somewhat (especially in the bodies) but this time putting the masks back on over the bodies before the next stencil then applying the paint as above.
There is a trick to layering stencils. I like to use ones that have a lot of detail (like the flowers) first then as I layer, the image need to have more paintable surface (circle stencil). Also, you do not necessarily need to use the entire stencil - pick and choose the areas that speak to you or have the most/best visual interest for your piece.
The piece definitely needed some definition - and thought the orange (or in this case Dina's Tangerine) would be a great asset. So I dipped my finger into the paint and ran it along the edge. I allowed it to dry a bit then went after it with a baby wipe and rubbed it off and blurring the lines.
And she is now done!


No comments:
Post a Comment