I thought for a change that I would go with a set plan in mind and not take a boat (okay truck) load of stuff I would not even use. I decided that it was indeed going to be an 'art journal' weekend - that is what inspires me and that is what I really want to do. So off to Pinterest I went and looked at my boards - what stood out to me was the SheArt by the very talented Christy Tomlinson. So forcing myself to pack accordingly was pretty simple. I picked two paper pads (one from the store and one from my stash), took only my paints (Dina Wakley Media Heavy Body Acrylic Paints, Liquitex Heavy Body Acrylic Paints, Golden High Flow Acrylics) and then most of my mediums (gesso, matte medium, gel medium, acrylic glaze, etc). I brought three journals along with a new one I created specifically for this project.
This all I took - as it turns out, I could have even eliminated the two file boxes (good to know for next time). On a good note though, I took the time to finally organize all my papers and ephemera pieces into 12x12" file pockets so now when I get going on my journal(s) it is all ready to go!

So enough of the boring stuff - let get going on what I actually accomplished!
It all started with an idea talked about quite some time ago - why can't you simply make a journal out of scrapbook paper from your stash? Lord knows I have a sizable stash of papers! So in I dug and came out with some old Making Memories and Jenni Bowlin papers. I wanted a good size journal, but not 12x12" nor did I want it 6x12" - so cut and paste I did so my final book was 8.5x11"! I scored, cut and pasted the pages together and then stitched it with twine.


The pages are mixed in patterns and size. It was fun, quick and easy to make - thinking it may very well be a new go to for me!
I started every page with a layer of Gesso - can't say it was really needed on all applications - but it did provide a good starting point. I tried to keep everything pretty simple, so applied it using an old gift card.
All the following pages were inspired by posts I found on Pinterest and can be found here.
Page One:

Once the Gesso was dry, I tore up paper from Basic Grey Fiction Paper Pad 12x12" trying to keep it more on the 'girlie' side.

Once I had the placement I wanted, I adhered it all down with Golden Matte Medium.

When it was dry, I applied a rough coat of White Gesso using a palette knife so it not only added texture, but toned down the colors.

I tore and cut up more paper to create the shape of the dress and then sketched a head and finger painted her hair.

time for some more texture - so modeling paste and stencils it is.

time for some doodling and finishing touches...


This is the second half of the page - I simply torn out four hearts and added some finishing touches!

darkened up the hearts with more of my Faber Castell Pitt Brush Pen (Black) and the writing on the side is with my Black Fude Ball

The finished page - love how the Faber Castell Pitt Pens work with Matte Medium. It allows you to blend within seconds of applications but once it is dry - it is permanent. I did find that I was able to manipulate the timing with either water or a baby wipe when needed within the first minute. The black scribble flower in the top is actually Tulip Fabric Paint, a technique I have been wanted to try. Have a ways to go with it still, not sure if I am liking the finish of the product, but am willing to continue to work with it an see what I can do.

Page two:
This one makes me very happy! I used as my base Dina Wakley Media Heavy Body Paints in Turquoise and White along with some Liquitex Basics Yellow. I applied it all with a starbucks card!


Once dried I added Basic Grey's Fact & Fiction Flags & Banners stuck down with Golden Matte Medium.

I used bit of the ephemera from Pink Paislee's Cottage Farms Paper Goods Ephemera Pack and accented with my Faber Castell Black Brush and Black Fude Ball pens and a Christy Tomlinson Script Stamp by Unity.


Really like how the different page sizes come into play. Sure love the Jenni Bowlin Die Cut papers!
Page Three:
This one was a challenge by my good friend and partner in craft crimes - Anita Bee! Anita is the one that usually 'takes over' my blog on Thursdays.
She gave me Florescent Poster Paints, sea shells and Prima Texture Paste Black Beads. Here we go!
I started with Golden Teal Acrylic Paint and paper from the Basic Grey Fiction Paper Pad.


Here we go with the florescents...

Texture Paste...

Bits of torn up paper (once again from BG Fiction), the stamped images are from an old Claudine Hellmuth Studio set - Doodles.

here are the sea shells...

I added my own finishing touches with more Faber Castell Brush Pens, stamps and scribbles!


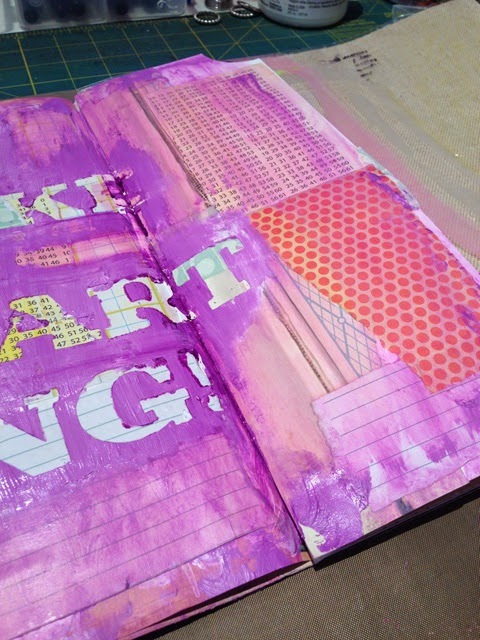
Page Four:
This time I again covered up the base with paper pieces

adhered it using Matte Medium

My color palette

Here is where I got a brainwave and got so excited and forgot to take a photo! I used Hazel & Ruby's Letter Mask to spell out a phrase. Painted over it with the above color palette.

when it is was partially dried, I pulled away the mask letters.

think I may have been a tad heavy on the paint (oops)!

I sketched out a heart and then went over it with my Black Brush Pen and blended it with my finger so it wasn't too clean.

outlined my letters with my Uniball Signo Black Gel Pen (it has a finer tip).

Wanted the heart stronger, so finger painted with some black acrylic paint.

Added a torn heart and colored it with some Dina Wakley Magenta Heavy Body Paint. I then outlined the large heart with more of the Tulip Paint in Yellow (almost a florescent) and then used a needle to swipe out the line to once again create another level of texture.


here are a few more close ups...


Well I think that is enough for you today! It is pretty heavy with photos so do not want to bore you. Will post more tomorrow...see you then!
Most products can be purchased over at the store (W2 Scrapbooking). Be sure to check me out over at Facebook where you will always find loads of tidbits, I would also appreciate a 'like' too while you're there. You can also find me on Instagram @bwdward with lots of fun photos.
Have a great day - let's make it a creative one!


1 comment:
Fab, love seeing the process :)
Post a Comment