Showing posts with label dina wakley. Show all posts

Thursday, November 9, 2017

A weekend of Inspiration & Creativity!

This past weekend was my semi annual getaway with my girlfriends - we have been doing this since 2012!  Twice a year we go to a place called Bittern Lake Lodge.  It is 'short' 3.5 hour drive away, but once we are all there...it travel is quickly never a big deal anymore.  And let's face it...living in Alberta (or Canada for that matter), distance is never a big issue as we all seem to to have to travel some sort of distance to get anywhere!

There are 14 of us that get together and the group can change slightly from time to time due to other commitments with some of our regulars.  But we always have a lot of fun and always look forward to the next time we get together.

This time around I really wanted to focus on one (okay, maybe two) projects.  I really edited what I was going to bring and still didn't use it all!  One day I will learn (not).

Here is a run down of what I worked on along with a few scenic shots (at the end)...


I decided to work on the Rae Missigman Scribblepedia class that I signed up for at Jeanne Oliver.  I will not go into too much details as this is a paid class and of course that would be just wrong!

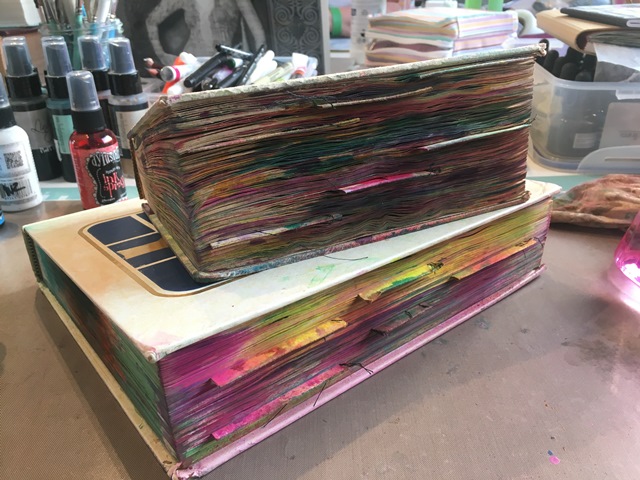
After completing my altering of my books (I created two, one in an old Readers Digest and the other an old Encyclopedia), I began to ink it up!


Love how big it is getting with the addtion of moisture to the pages!  Some don't like this part...I LOVE it!


I used a variety of wet mediums - Dylusion Spray Inks, Jane Davenport Mermaid Markers, Dylusions Paints, Dina Wakley Heavy Body Paints, Tim Holtz Distress Crayons, FW Acrylics, Lindy's and just about anything else I could come across that I could add color to my pages!


Just look at all this color - a book full of bright, vibrant and fun color! 


I even tried manipulating the inks with my keycard to see if I could bet different designs on my pages! Why not?!


Didn't work as good as I would have liked.  But I did learn that I should have done one side at a time and then it would be way better! Live and learn!!


I am getting so excited with the look here! The colors are so bringing me joy - I do realize now that I will have to figure out some sort of closure eventually!!


Here I am doing the same thing but now in my encyclopedia.  I did notice that the sprays reacted very differently on these pages verses the (really) old book.  I was totally okay with it though.  I quickly discovered which paints and inks worked best - in this case, the FW Acrylic Inks and all of the paints.  The Spray inks I really have to work with, but you can see in some of the images that they worked out really good...


...that was due to me NOT adding the spritz of water!


Now it was time for me to move into one of my upcycled journals you saw me create in a previous post.  This particular one is the Sunrise Sunset one (see it here).

Used loads of Stencil Girl Products stencils and Dylusions paints.  For this particular one, I used the new Dylusions paint release (fall 2017).  I will list the stencils used under each photo.


As I added more colors, I added more stencils.  Important to note that in the way I use stencils I often use the same one for several colors and layers.  I simply keep moving, flipping, turning, and what ever else I think will make a difference...as I proceed on my page.


Time for yet another stencil...


More layers of paint and stencils...

StencilGirl Products M109 & S200


Now the addition of a few scribbles using waxed crayons.
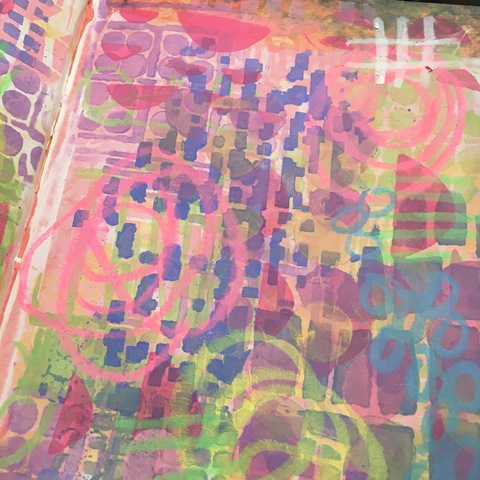


StencilGirl Products M046, M103

and more doodles with the AC Chalk Crayons.


Onto my next page, having a blast with the Dylusions paints, this time onto the original 2015 release colors! 

StencilGirl Products M108, S378

StencilGirl Products M105, M092, M080
Along with the stencils used in the above image, I also used my brush to create marks and some of my very old American Crafts Chalk Crayons (which are basically the same as Tim Holtz's Distress Crayons).

StencilGirl Products S424, S506, M109, S503

This next one I seriously forgot to take pictures along the way!  I was having so much fun and was on a roll...

I used the Dylusions January 2017 release colors and of course more StencilGirl Products stencils (the white scribbles are using the Sakura Gelly Roll White Pen)! 

StencilGirl Products S503

Additional color scribbles are my American Crafts Chalk Crayons.

StencilGirl Products M080

Really like how this page turned out!!


On that, I will sign off for today as to not keep you here too long!  There are more pages to come tomorrow, hope to see you then.

But first, as promised...here are a couple pictures of us all creating away!


See you tomorrow...

Don't forget to keep an eye on my Instagram and Facebook accounts (and I'd love it if you would follow along) as I tend to post there more often (just not as much detail)!

Most products are linked to my online store W2 Scrapbooking & Mixed Media Art Studio and if I don't carry it, I will often link to where you can find it.

until next time...

Wednesday, May 10, 2017

Proof of a Creative Weekend Part I

Had a great weekend with my girls, three nights/four days of creative bliss!  Well, let's say I had two full days of creative bliss- the first night I was just not feeling it.  Once I unpacked, I looked at my table and went...nah.  So headed to the couch area and chilled with a bottle of wine, the hockey game and a few other girls that were in the same boat as me!

My goal this weekend was to work on these prompts from Rae Missigman's Art Marks 30 Day Challenge. As you can see from the picture, I didn't get near as many completed as I had hoped!


Woke up Saturday morning ready to go and did 7 prompts over the course of the day.  I was on a roll and am sorry to say I didn't not take many photos along the way.  I will do my best to list the products I used.

Prompt #1 - Clustered

I started out thinking I would just used gelatos, distress crayons &/or Art Crayons as my go to tools for this challenge.  I didn't last long.  I didn't like how they where mixing with my stencils, so out came my Dina Wakley Media Heavy Body Paints!  They make me happy.  I applied White using a keycard and really scrapped and scratched them into the base I had already started, it gave a muted look which I was happy with.  I them started pulling out some of my StencilGirl stencils (S330 Modern Buds, M080 Repetition S376 Hashmarks) that I figured would work for this prompt.  I used Lemon, Ruby & Night.  Once the colors were dry, I used my Sharpie Extra Fine Point Marker to make some marks (doodles and scribbles) along with my Pilot MultiBall Pen.  I do not carry these in my shop, but a good substitute is the Fudeball or UniBall in black.


Prompt #2 - Repeating

This next one I really struggled with and am really not happy with, but as you all know, I tend to just turn the page instead of worrying about a page too much....this is one of those pages!  I used Dina's paints in Magenta, Sky & Elephant.  The colors look off as I did not clean the stencil or the sponge after each application.  The stencil is from Carabelle Studio, Edge Template - Rounder (TEE0005). I then created a repeating pattern with one of my black markers.  This is the point when I simply decided to turn the page and move on.


Prompt #3 - Layered

This has many many many many and yes, many layers of paint and stencils.  I used more StencilGirl stencils in circular pattens and used a different color for each.  I started with Lemon, then went to Lime, then Magenta, Tangerine, Blackberry Violet and finally Night. The Blackberry created a bit of mud in areas, so I used White and rubbed it in with my fingers to soften it up in areas before I started my doodles. I doodled using my Sharpie Extra Fine Point in White and then a Pebeo 4Artist Marker in Black & Green. The fine doodles are of course the Pilot MultiBall.


Prompt #4 - Stacked

This one was a blast! I actually stacked stencils on top of themselves then applied the paint through what pattern it created.  Thankfully I actually took a few more photos of this one along the way.  Each time I used a color I either switched the stacking sequence or added another stencil. I used Dina's Lemon, Ruby & Black. Stencils were Crafter's Workshop (TCW547 Repeating Pods), StencilGirl (#L301 Circles Circles ) and Dyan Reaveley (sorry, will have to dig it out and find the product number).


Here I added for a finishing (almost) touch is another Crafter's Workshop stencil - Art Is in 6x6" then again just added some more black.  Really like how it completes the layers...oops, I mean stacks!


Thinking the page needs some pop, so I used the Sharpie Fine Point in White and Pebeo 4Artist Marker in Yellow to doodle a few of the patterns, happy with it and moving on!


 Prompt #5 - Round

For this one I really wanted to go out of my comfort zone and go more towards the pastel palette.  I used a fair amount of gesso so it was a good base of white and when I apply the Dina paints with a sponge through the stencils they tend to take on a pastel look.  I used the Crafter's Workshop stencil Positivity (#TCW687) with the following paint colors - Lime, Magenta, Lemon and Turquoise.
It was a little to blah for me, so I added some punched pop dots that I downloaded from Roben Marie's site and glued them down.  Once everything was dry, I began to doodle.  Again, using my Sharpie, UniBall, Pilot MultiBall &/or 4Artist pens/markers.


Prompt #6 - Black & White

For this one I used a stencil from StencilGirl called Circle Web (#L404), I gesso'd by page in white then applied a good coat of Dina's black paint with a craft sponge so it was very dark. Then I lifted the stencil and spritzed it with water and laid it face down on the opposite page.  The areas that did not come through I simply filled in with a black marker.  Once it was all dried, I used the White Sharpie on the black and the Stabillo All Graphite pencil on the white.  blended with my wet finger and called it done.  It was a pretty quick page and really like the results. 


Prompt #7 - Arrow like

For this one I once again used a variety of stencils - Crafter's Workshop stencils (TCW227 Chevron, TCW687 Positivity) along with StencilGirl (M077 Look Here Trio) and used Dina's Lemon, Ruby & Black for colors.  It was very dark and busy so I ended up adding white gesso over top that I simply applied using my finger just covering up in certain areas to create a look I liked in the end.  I then added doodles using my usuals - Sharpie, Pebeo & Pilot MultiBall.


That's it for Saturday - will do my best to get back on here tomorrow for Sunday's creations.  There were some good ones!

For now, thanks for sticking around - be sure to follow the links back to the shop for items used on these pages.  Have a great day and stay creative!!

That Other Neutral Triptych

  That Other Neutral Triptych wrapped canvases 10x10x1.5" (x3) professional grade artist materials I worked on this smaller series at ...