
Little ol' me from very small town (okay it's a city, but not really) Northeastern Alberta. Needless to say I was beyond honored and humbled to even be asked! I have been playing in the art world for more years than I can remember. My parents were always encouraging any of kids to 'just try' - that is all they ever asked of any of us. Oh and try did I! Always into some form of art, craft, material, paint, ink, photography....you name it I dabble in it. I have been 'art journaling' for over well 10 years now and am always 'just trying' something different and pushing the boundaries of art and its mediums.
If you follow me here or on social media, you will see my only real weakness is (are) stencils! I have what many would say are too many, I however and pretty quick to shhh them! Who am I, or anyone else for that matter, to say no to a stencil? It is one of the few tools out there that are multi-use (in more ways than one as you will see in the post), re-usable and not to mention inspiring!

Full blog post on above available on StencilGirl Talk
As I was preparing my project for the post, I tried a few different versions of it that I did not include in my submission for the StencilGirl Talk blog post and will share one with you here now.
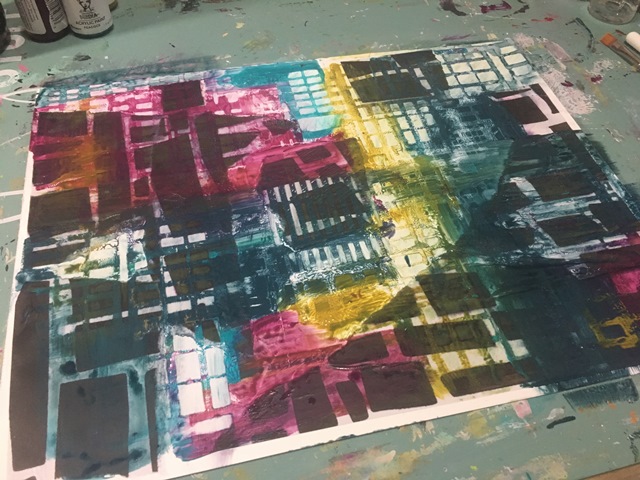
I started with some of my digital mark making printed papers I created on the Paper FiftyThree app, torn it up and placed it down in the same way I would plan out a page...just to make sure (not sure why, just something I do in case you actually see the paper at some point).

I wet the Yupo (11x14") first with my spray bottle and moved the water around with my brush

I adhered the papers down using Golden's Soft Gel Medium

I had just gotten in the new Dina Wakley paint color release for Winter 2018, so thought it was a perfect time to try them out.

I started applying the paints with a heavy hand as well a very wet brush. I like this format as it gives me a great variety in the visual texture of color on my substrate. Not to mention, Yupo is an synthetic watercolor paper and reacts amazingly to this application.

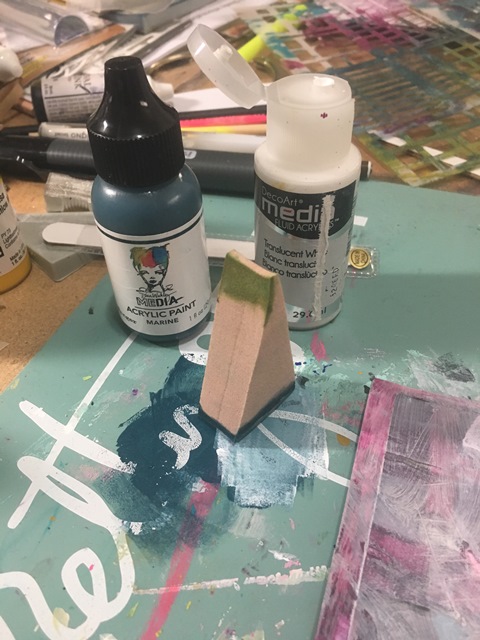
Colors used: Eggplant, Peacock, Olive and Marine


I pulled out my first stencil Buildings (L240) and began rubbing off some of the paint to expose the paper and white of the Yupo below.


You can see I continue to move, flip, flop and turn the stencil all over the page.
I pulled out my favorite mark making tool - a flower pick! Yes, a flower pick! You know the ones that come in the arrangements that hold the card!!

I just played for several minutes making marks and patterns along the way, trying to keep in the same shape family.


I decided I needed more layers - so I grabbed another sheet of my digital images, tore it up and added to the mix using Soft Gel Medium again.

I tend to work in layers in one way or another - in this case using the papers and stencils, I placed them down in areas I felt needed the most work or visual interest (or just didn't like what was underneath)!

This time I added layers with paint through the stencil. This gives you the reverse image(s) you would have wiped away in the precious application. However, this time around I used a different stencil, Batik (L320), again trying to stay in the same (similar) pattern family...linear.


Now it was time to take some of the paint away...
I know, but it is how my mind works....
Layers, remember?!?
Back to the Buildings Stencil.


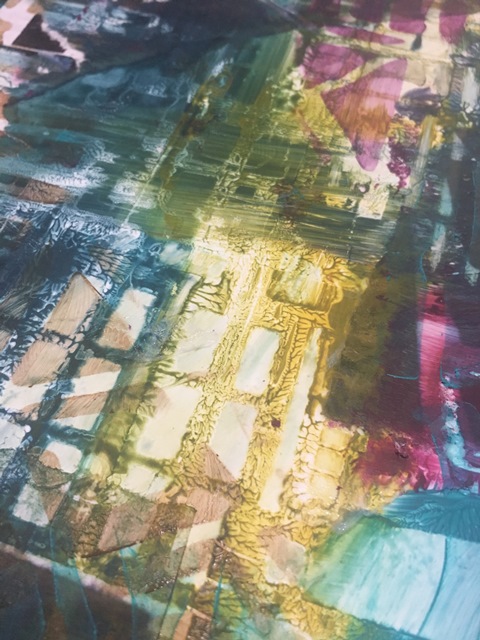
It was becoming too dark now, so decided to add a layer of DecoArt Media Translucent White Fluid Acrylic Paint. I simply applied a fairly light coat using a dry brush.

Along the way, I took a drop of a couple of the colors (Olive & Peacock) and again dry brushed them while the surface was still wet so I got a washed out and soft look.


Now, again, it was time to take some away....
This time I used Simple Geo Squares (L212) to take away some of the white allowing the brightness from below to come forward.

When i take away, I use a baby wipe. If you are getting near the end of your package (or your pack is overly wet), I recommend wringing out some of the excess to avoid seepage under your stencil.

You will note that I did not necessarily rub away the entire area of the stencil - I like the randomness I can get, yet still being able to see a pattern.

As will all my stencil application, I am always moving, turning, flipping and flopping the stencil all over the substrate. I am always looking for and area that need to be either hidden or brought forward.


I once again pulled out the Batik stencil and used areas of it to create more visual interest on my substrate.

Now I was getting adventurous and decided to add yet another layer of color through the Simple Geo Squares stencil using a mix of Marine and Translucent White blended using a Sofft Sponge applicator. I also used the same idea using a few of the other colors again mixed with the white.

Wanting to enhance some areas, I used a Charcoal pencil dipped in water and did some rough outlining around the square/rectangular shapes.


Now comes a fun technique. I laid down the Buildings stencil, sprayed it with Rubbing Alcohol and started rubbing off areas with a baby wipe. Now many will ask why the rubbing alcohol, I say why not - best part, it gets your paints moving!


Love how it was coming along. I probably should have just left it at this point but heck, that is so not in my nature...I always seem to just have to go one step further!
In this case, I pulled out one more stencil - Shape Shifter (S526) and light coat of Dina Wakley Media White paint.


Not sure you can really see much of it, but it did soften up a few of the stronger areas. At this point I put it aside and moved onto my next project.

Chances are this will show up in another project at some point. As mentioned in the StencilGirl Talk blog post , I will reuse many of my pieces - often in journals; scanned, copied, edited, cropped, cut, photographed...I have even copied them and used them as image transfers on top of some of my own work.
The possibilities are seriously endless...I give the word recycle, reuse, re-purpose and reduce a whole new meaning!
Thanks for stopping by, look forward to seeing you again!
In the meantime, you can usually find me more often over on Instagram or one of my Facebook Pages W2 Scrapbooking Mixed Media & Art Studio (only until end of 2018 then it will be removed) or the newer W2 Studio Arts (be sure to like & follow).
Don't forget to check out the online store - there are loads of great deals to be had with this being the last year - stock is moving fast! Be sure to use the coupon codes, they can be found on the home page.
until next time...


No comments:
Post a Comment