Showing posts with label inspired by. Show all posts

Thursday, May 31, 2018

Color Trio Inspirations

I signed up for a class by Rae Missigman over on the Jeanne Oliver network called A Guided Word a while back and just didn't have the time to go through it.  I will say, I probably should have read more about the class before I bought it, but I will say, I still took something away from it....Color Trios!  Now this really is not something new, but honestly, something many do not follow or take into account when working on a piece.

As many of you know, I am a huge fan of understanding the product and the process.  I take many classes and read a lot (and I do mean a lot) of materials on everything about art. Many are intrigued by how and what I take on a class, book, article, video, etc.

If you have taken the course or want to - please be sure to look into it.  I took something totally different from it that I am sure was expected.  In all honestly though, that is the pure joy of art - it is all about perspective...your own. Your perspective, YOur perception, YOURr view, YOUR understanding, your take, simply....your way!

Rae worked her way through the course offering three different color trios to work with, I however; took it to a whole different direction.  I used the 'colors' in a way that was inspiring to me - more abstract - more in the way of Jodi Ohl inspired.

Follow along if you wish and see how I used the the color trios....my way.

Abstract Grunge

My first color trio was Teal, Green Gold & Luminous Rose (and of course Black & White for tinting, shading and accent). This would be known as a Split Complementary on a Color Wheel. I painted on a 12x16" Canson Canva ArtBoard.


I applied all the paints using either a brayer, Catalyst Tool or Wedge. The further I got into it, I pulled out some brushes (Brights in varying sizes) to allow me to get better definition along the center of the piece.


Made marks using my flower pick or edge of rubber brayer. Created the black lines using a very old American Crafts DIY Patterned Brayer (Stripes). 


Splattered the three main colors that were mixed heavily with water using my 1" Bright brush.


I scribbled using a water soluble Graphite pencil  as well as a Charcoal pencil when I did not want the seepage.


This was a very fast and simple piece that was done in less than an hour. Really love how it cam out. Using the textured brayer was a great blast from the past - do you have a favorite tool from year ago that you still love to use?


Abstract Color Blocking

The next color trio I used was Deep Violet Purple, Luminous Rose & Granny Smith
I once again used a Canva ArtBoard to create this piece.


Creating an 'under' image is something used by many artist to simply get something down on the canvas when they often fear the white of a canvas.  I do not have this issue, this base was an older piece I just didn't like so covered with heavy black gesso.  Once it was dried, I wrote out some lyrics from a song I like using a Liquitex Paint Pen in White.  Once it was dry, I used a water soluble crayon to sketch out the basis for my blocking.


I filled in my spaces with a mix of the paints - some pure, some mixed with others, some mixed with white (heavy body or translucent)


Using a brayer, a sheet of deli paper or a baby wipe - I adjusted the amount(s) of paint on each area to get it to a depth I was happy with.


I scraped, scratched, spritzed and splattered along the way.


I would often use the baby wipe and pull away a good amount of the paints in order to show the words beneath.


As you can see by the number of photos along the way, there was a lot of adding and subtracting along the way.


This is how is sits now.  Really liking the vibrancy it has - so unlike me with the brightness, yet so me with the grungeness.
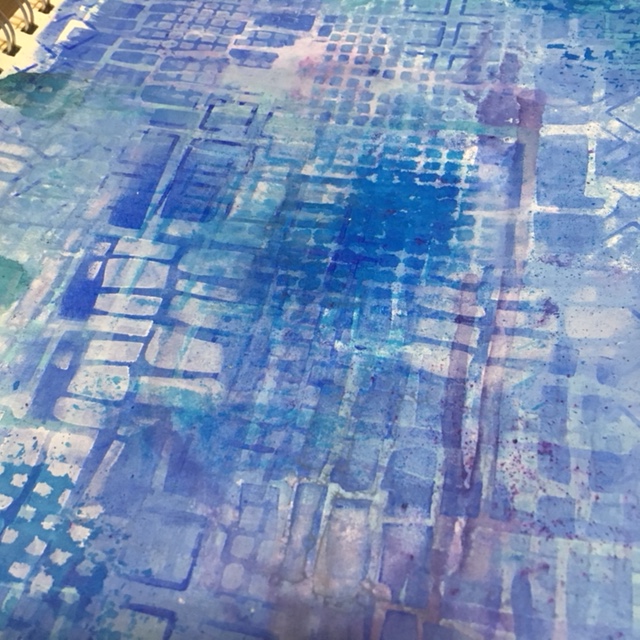


More Abstract Gunge


The next color trio was a tough one to work with.  They are all transparent! Quinacridone Nickel Azo Gold, Quinacridone Magenta & Transparent Pyrrole Orange.

I once again did the writing on the canva board, however this time I used the white base and wrote with a black paint marker.


I missed taking several photos along the way - could have to do with me now liking how it was coming along.  I painted over the entire piece a couple of time using Liquitex Soft Body Titanium White Acrylic Paint. Always using my brayer to apply and my flower pick to scribble.


I used some of my vinyl number stash to attach a meaningful number combination. Then continued to apply more paints as well as take away when needed.


You can see I once again used the American Crafts DIY Brayer to add some much need visual linear texture.


I continue to apply layers using one of my smaller brayers, adding little color patches along the way.  I will sit back look at it and decide where it needs a pop of color or a push/pull back of color.


Blending with a brayer is one of my favorite ways to work a piece.  If you use the brayer too much on a wet surface you will often get a strong pull right from the bottom - hence a pulling/tearing of the substrate.  Sometimes it is okay, others it can ruin your piece...so be cautious.


Needing some definition, I pulled out a graphite pencil and started making my own definition - as seen here with the 'cross' which aided in dividing the colors and therefore creating a new focal point.


Here are a few close ups to see the amazing texture I was able to get along the way.


Will say not one of my favorite combos, nor final outcome, but will say I learned a good thing or two along the way....which always make me happy.


* * *

You can usually find me more often over on Instagram or one of my Facebook Pages W2 Scrapbooking Mixed Media & Art Studio (only until end of 2018 then it will be removed) or the newer W2 Studio Arts (be sure to like & follow).

Don't forget to check out the online store - there are loads of great deals to be had with this being the last year - stock is moving fast! Be sure to use the coupon codes, they can be found on the home page.

until next time...
* * *

REMINDER: The shop will be on 'vacay' for the first two weeks of June.  Even though you will still be able to submit orders, I will not be filling, shipping nor replying to emails.


Wednesday, November 15, 2017

Just add Color!

In today's post I'll share a few of my pages I have been working on while partaking in Kiala Givehand's "Hacking the Color Wheel."

If you have followed me for a while, you would have heard me talk about Kiala before (remember the Inspiration Decks?).  Anyhoo... I decided to take part in this class as we all know I have an affliction for color. If there is something out there to learn about it, I want to learn it!  So far I haven't had the chance to do all the lessons, but I have singled out a few that I really enjoyed.

As this is a paid for class, I can't share too much, but I will share the instructor's website link and my thoughts on the actual lesson that I have done (or still working on).

Here are a some peeks at them...

Emily Mitchell's Color Weaving


Colors used: Golden Heavy Body Ultramarine Blue, Golden Fluid Acrylic Burnt Sienna, Liquitex Heavy Body Titanium White; Golden Glazing Liquid Satin Finish.

The basic idea of this piece was to work with color to push and pull your colors on your substrate.  By this, she means the use of color AND mediums.  By pushing in and pulling back your colors, she achieves what she calls 'color weaving'.  Understanding your mediums, helps with this process.  If you go to the manufacturer's sites, they are loaded with information to help you figure it all out.  If there is something you still don't understand, fire them an email - they are always so helpful.

Emily's medium of choice is Liquitex Glazing Liquid.  She blends this with her paints when she wants to get the transparency of colors that will then allow for the reveal of the under painting.  It creates depth and yet luminosity to your piece. 

Tipster: it (glazing liquid) does tend to speed up the drying time, so if you are wanting to extend this, you will have to add another medium - Liquitex Slo-Dri or Golden's Open Medium.

Here's how I got started:


This image shows the difference between paint mixed with glazing liquid (L) and straight up paint (R). It is very obvious the difference and you can see how it will produce depth in your art. 


I didn't take a lot of pictures along the way, I started applying with my brush but quickly wnet to my fingers.  Blending with the Glazing Liquid is awesome!


You can see marks within the image shown; these were done with bubble wrap, dowel and my paint brush or finger.


Here is how it stands now.  There is still so much to do on this one - I have some great ideas on taking to the next level, having said that, I do quite enjoy where it is right now, and may very well leave it there and start this format on a larger substrate (wood or canvas)! 


One important note I did take from this lesson was the comment of  "intentional art verse intuitive art."  This is something we all should think (or not think) of while we are painting....in other words....JUST PAINT!

Mary Nasser's Mixed-Media Stenciling Techniques & Color Schemes


Paints used: Dina Wakley Media Lapis, Sky, Ocean,; Golden Heavy Body Ultramarine Blue, Liquitex Heavy Body Titanium White, Decoart Media Tinting Base, White Gesso, Ken Oliver Color Burst, Ranger Alcohol Ink, FW Acrylic Indigo Ink, Dylusions Ink Spray.

This one was a fun one, Mary's style is very similar to mine - where as she is not afraid to try different colors and mediums on the same piece.  She also uses a ton of stencils (she designs for StencilGirl Products).  I didn't take very many photos along the way as I was really on a roll and having a blast!

As you can see from my color listing below the image above, I used a lot of variety.  I simply just started pulling anything that was liquid and was blue!  Having thought back I could have used some more paints (Tim Holtz, Decoart Media, Prima, etc) and also use some more liquids (distress stains/sprays, Lindy's, Prima, Studio Calico), you get it - just start pulling out of your stash!

I simply started creating layers with the stencils, doing my usual flip, flop, turn, move and manipulate the stencils all over the page.  I tried to keep with a 'square' them on the page and used the following stencils from StencilGirl Products - S505, S414, S374, S375.

TIPSTER: When layering your stencils, be sure to not only change the colors (light to dark), but when moving, flipping, flopping them around, there is actually a method to my madness! Always look for white space (not necessarily literal) to add the next layer of color.

As you peruse the images below, you can see how I accomplished this.  You will also not that I tend to add white to my pages along the way to either brighten or tone down an area.  I used Decoart Media Tinting Base a lot on this page.  I really like using it as it tints the color without actually loosing the pigment of the color and depending on how much you use, can make your color opaque.


It was a fun lesson that allowed you to PLAY!  She encouraged you to just try.  That is something I encourage all the time - what is the worst that can happen?  You start another page/canvas/board.  It is JUST PAINT...so JUST PAINT!


Kiala Givehand

This next one was a live session with Kiala where we talked about color and how they made you feel.  I am not really a color feel like of person to that depth (ie meaning behind the colors you choose), I am the person that just grabs a color and paints. There probably is a meaning behind it, but I just want to paint.

She started us off using watercolors on our page... (sorry no pictures).  I was not overly impressed with the base, so I decided to paint over it.  I pulled out my Liquitex Heavy Body Titanium White Paint as I find it gets some of the best coverage.  Having said that, the lesson from Emily popped into my head and so I decided to bring in the Glazing Liquid into play here!

The different shades of color you are seeing are actually the mix of the glazing liquid with the white so you are able to see the under painting.  I wiped and added, wiped and added again; pulled out a couple stencils S375 & S505 - wiped an added yet again.  Then I wanted to add some black, so I used Charcoal Vines (dipped in water) to get mark making effect I was after.


These last two photos I decided to edit on my phone to show you how a simple click of a button you can change the perspective and perception of an image.

These are the same photo, I just edited them both with filters.  One was enhanced using  the Instagram filter  Lo-Fi; the next is zoomed. cropped and filtered to black & white on the iPhone Photos editing tool - Noir.


The pop of color and and the depth that one gets from these is very interesting to me. Perspective and perception are interchangeable, especially in art. Using 'words' in art is an interesting concept. 

Ones perspective can change ones perception and perception can change ones perspective.  Just a little thing to think about next time you look at your own work or even someone else's.


Don't forget to keep an eye on my Instagram and Facebook accounts (and I'd love it if you would follow along) as I tend to post there more often (just not as much detail)!

Most products are linked to my online store W2 Scrapbooking & Mixed Media Art Studio and if I don't carry it, I will often link to where you can find it.

....until next time.

That Other Neutral Triptych

  That Other Neutral Triptych wrapped canvases 10x10x1.5" (x3) professional grade artist materials I worked on this smaller series at ...