Reminder of the prompts...
product focus - ephemera
tool - brayer
muse - numbers
Here goes a little (okay a lot) tutorial on the process....
This post is going to be heavy in photos, so I will apologize now (I even edited down the number I posted, I seriously took a ton of pictures along the way).
Once I was happy with it, I took a picture of it, something I highly recommend. It is amazing what you can see through the lens of a camera - gives you a total new view. This is when I decided I want to add a few more elements and pull out a border punch and add some texture (holes)!

All the paper (aside from the ephemera) is from two sheets of paper, simply double sided so used both sides since they are already coordinated, might as well use them right?!

When I was happy with it, I started adhering it down with matte medium following the image I took earlier, I'd say I did pretty good. Note: the matte medium is on top as well to seal the paper. Allow to dry now.

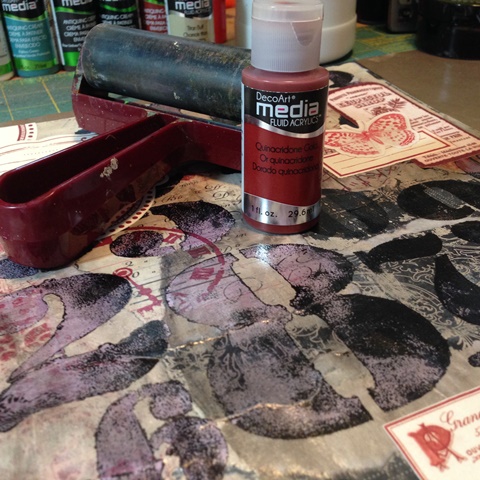
Nextt was to use my brayer with some fluid acrylics.

I simply squeezed some onto the page and rolled away. Allow to dry for about 2-3 minutes or until is becomes matted and not as shiny as when wet.

Now comes some fun - start rubbing with a baby wipe! It will be a bit tough, but keep rubbing, the results are so worth it!

Rub as much (or little) as you want. I really wanted more of the red to come through, so I rubbed a lot off.

I really liked it right now, but knew this couldn't be the end! I still had to add numbers!!

Thinking I wanted to seal it at this point (in case I screwed up), I applied a coat of Finnabair Art Basics Soft Gloss Gel by Prima.

So my big idea now was to apply Dylusions Black Marble Paint through a stencil using a brayer! Hmm...will it work? Yes...but it is messy and takes a lot of maneuvering as the stencil is a Donna Downey Studio Stencil (DD088 Numbers) which is only 8x8". So I played around and got it to work. This is where my mistake happened - but turned out to be my next ah ha moment. I had to place it down four times and therefore had to dry it four times...oops! Once paint is heat set or dried totally...it is kinda permanent!

Kinda being the operative word here! With a lot of elbow grease, baby wipes, water and rubbing alcohol... I got a good chunk of it off, but look - there is pink under that black! Have been looking all over the internet to figure out why - not sure I have gotten the right answer yet...so will continue more on that quest for sure.

The top left hand corner was the last one done, hence the big smudge. There was half of an '8' there and obviously still wet enough to rub off. So what do I do...apply the heat tool to finish drying it...what a hot mess! I was so bummed at this point - but not willing to lose to paper & paint!

Time for more Ephemera to the rescue!

More of my stash (sorry), Jolee's Boutique French General by EK Success. Note - this ephemera is a fabric based product and why I love it so much! Once again adhered down with Matte Medium.

Time for some color...anything but pink! Quinacridone Gold by DecoArt Media again applied with my brayer.

Waited only 1-2 minutes and wiped it off using baby wipes.

I tried to use one or two of the more saturated wipes (saturated with the paint I was removing) to rub into the recently added ephemera so it was not too stark. It helped a bit, just not enough.

Next came the Liquitex Light Modeling Paste. I used my palette knife and scraped it in a few areas that wanted to either cover or tone down.

Once it was dry (yes, I actually waited over night for a change), I added some Titan Buff with my brayer and my finger when I only wanted it in specific areas (like the modeling paste).

Yep, then I rubbed it off again (using baby wipes).

You can start to see the direction I was going now can't you. Layers and layers of paint!

So now thinking it too crisp now, mix up some Quinacridone Gold and Acrylic Glaze and applied it with my fingers in strategic areas (hahaha, really)!

Then waited the token 90 seconds and promptly wiped it off with a baby wipe yet again!


Kinda got what I was after - but thought I might as well go another step (or two or three or...). Once again I put down some paint - this time the DecoArt Antiquing Cream in English Red Oxide using of course - my brayer! If you haven't picked this up yet...you need too!! It is so much fun and the effects are amazeballs!!


Allow to fully dry. Easy to see once it is dry!

Now is time to wipe it off. You can use a baby wipe (my choice) or a damp cloth.

It comes off pretty easily. Depending on how often you change your wipe, will determine how much is cleaned off.


Time for another layer of Antiquing Cream - this time Titan White.

This time, once it was dried, I stamped (Dylusions Stamp Set Basic Backgrounds) it with Archival Ink Jet Black


yup...then I wiped it off yet again! Really, there is a purpose for all of this (in my mind anyways)!

Now I was getting ballsy! I had seen a technique by Andy Skinner on the DecoArt YouTube Channel of Andy doing some cool layering techniques a few days back so thought I might try my take on them. I thought I would try using the Dorland's Wax as my resist...what's the worse that could happen...right?!
So I put on some of the wax in areas I wanted to show up once I put the next layer of paint on...

...then boldy went where I dared to go! I added DecoArt Green Gold! How would one think to even use that color? Why I consulted a color wheel of coarse!

Spread it out with my brayer (it's getting a good workout).

Once it was dried, once again - I stamped with the Archival Ink.

Once the ink was dry, I started wiping away! Heaven isn't it!!


So needless to say, I simply couldn't stop there! I once again consulted my color wheel and ended up going with Dina Wakley Heavy Body Paint in Turquoise! I repeated the same steps as above with the wax and paint. I did however use a brush this time after I had rolled it out as I wanted to really get it in all the nooks and crannies.


Let is dry (with the help of my heat tool), then started to wipe.


I really like it but did find it too blue in a few areas. So I simply added a few swipes of Green Gold with my finger in the areas I thought needed it. Tried to let it dry.

Wiped off what I wanted.

Ya, then it was too green! Repeat with Turquoise now!

Wipe off until I was happier.

Why not...one more turn! Again with the wax in areas I wanted to save. Then used the Quinacridone Gold and my brayer for a light coat.

Made sure I let it sit long enough..okay - 3 minutes! That's a long time!!

Then wiped off to get this masterpiece!!


What next? I have no idea! Will I add to it? I don't know. For now, I just want to keep looking at it!
Thanks for stopping by and sticking all the way through this long process. Hope you were able to get some great tips along the way and would love to see your take on it too.


