Showing posts with label ranger. Show all posts

Sunday, April 29, 2018

Sunday Inspiration

2018 has been a challenging year for me so far - so much going on behind the scenes that have really limited my time in the studio.  When I do get in however, I make the most of it!

I have not had much time to share here on my blog, so today I am taking a bit of time to share one of the pieces I did - I hope you enjoy!

Inspiration - Alcohol Inks

Playing with Ranger Alcohol Inks on Yupo paper isn't something I have done for a few years!   I had been taking an online workshop by Wendy Brightbill and this was something she was showcasing in her workshop.

I must say, it is always fun to delve back into something you haven't even looked at in three years!

In the first photo, you can see the colors I chose to use (Dandelion, Wild Plum, Aquamarine, Red Pepper and Pitch Black)


In the images that there is more 'flow' (vs seepage), that usually depicts that I have a good amount of Rubbing Alcohol down.


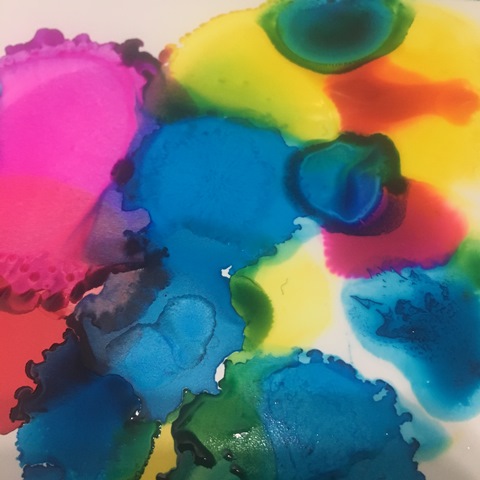
Here, I have dropped the Rubbing Alcohol directly onto the 'cells' in hopes of making some interesting visual textures. Really like how they look when wet, but they often dry with a smoother look, which you will be able to notice further into this post.


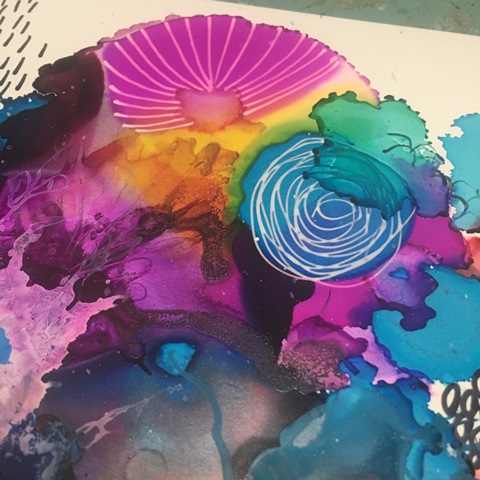
Now that this layer is dry, I have decided to add another layer on - Daler Rowney F+W Acrylic Inks.

You have seen me use these many times in the past, but I had never used them along side my Alcohol Inks...fun results!

Colors used: Lemon Yellow, Turquoise, Process Magenta & Purple Lake


Yes, these are a fluid, but I even added more fluidity to them with the addition of water and/or rubbing alcohol!


When I get larger puddles. I will pull our a shaping tool and move the colors, puddles and rivers around.  Getting them to flow more, intersect and create yet more patterns and colors.


You can see in a few spots I tried to add a few marks - these were done using Alcohol Markers (Copic)


I introduced the White from F+W Acrylic Inks in hopes to lighten up the piece a bit.  I tried t make it so that it was diagonal in nature and therefore would draw your eye along the piece.


There was an area that was too dark in the top left, so I added white there as well.  Along with some water and forces the colors movement using my shaping tool.


I love the close ups on this piece - they remind me of sliced geo stones. 


Now it was time for some mark making!  I varied my tools from Sakura Gel Pens [Souffle & Raised Ink (Clear)] along with Golden High Flow Acrylic in a FineLiner.


I found it once again getting too dark and even busy if you can imagine - so I added more water to the river that ran through it....

Yup, too much!  Sometimes this works to my advantage, other times not so much.  This time, I was not wanting this to happen.  


So how does one fix this?  Well in my case, I added even more fluids....


 Golden High Flow Acrylic Paints (Teal, Quinocridone Magenta, Hansa Yellow Medium and Naphthol Red Light) along with even more water of course!


Really was not happy at this point and was about to toss it.  You can see areas that I added more alcohol inks, paints, inks, water and even rubbing alcohol - UGH!


Gesso to the rescue! Super Heavy Gesso and a good amount of water!


 I walked away at this point, thinking it best to let it dry and decide at that time if I wanted to continue or simply move onto my next inspiration....

You can usually find me more often over on Instagram or one of my Facebook Pages W2 Scrapbooking Mixed Media & Art Studio (only until end of 2018 then it will be removed) or the newer W2 Studio Arts

Don't forget to check out the online store - there are loads of great deals to be had with this being the last year - stock is moving fast! Be sure to use the coupon codes, they can be found on the home page.

until next time...

Friday, September 15, 2017

Continuing to be inspired...

I have been taking a good amount of time (for me anyway) for me and journal(s),  paints and books.  We all know how little time I take for me - family always comes first, then work, then life then me.

Since my weekend with my friend a few weeks ago - I am trying hard to take the time to play and take time for me. Some days are better than others, but it will be a slow process no doubt.

Here is a sampling of what I have been up to:

I had gotten a bunch of new Stencil Girl Products Stencils (yes, an expensive vice of mine), I order from the states directly from them, I wish I could bring them into the site, but they are keeping the online sales to themselves (fair enough for them, just not for me..ugh). I started the page with a base of mixed torn tissue paper and book pages all adhered using Collage Pauge.  One dried, I did a wash of Titan Buff and Glazing Liquid.  I just wanted to soften and even out the color tones.


Now it was time to get busy!  I apologize for the lack of process pics along the way, as I got excited and was on a roll!  I used about nine or ten of my newest stencils really layering them in and using a variety of Dina Wakley Media Heavy Body Acrylic Paints in blues, greens, black & white.


I think I took it a bit too far, so I decided to put another wash over top to bring it down again. then came up with the idea of simply using straight Titan Buff through some of the stencils again over top to create more levels of visual texture. Simple but kinda cool!  Here are a few close ups.


This in turn gave me another idea...what about a monochromatic(ish) page? So I pulled out all the 'blues' (Sky, Turquoise, Ocean & Lapis - don't ask why I forgot Night) in Dina's line and once again pulled upon my newest Stencil Girl Products stencils


As you go through these photos, you will see that I seldom (if ever) use the entire 'image' of the actual stencil.  I use bits and pieces of each stencil and 'fill' in as I go along.  Usually changing colors with each stencil and/or coming back with the same stencil but using a different color than in the previous application.


The big thing to remember when doing it this way is to work your colors from lightest to darkest.  There is an exception to this rule of mine...WHITE.  I tend to add white near the end of my page.  They often need to be softened or areas need to be made a focus.


In this case, I did add white but it is very hard to see and I used a sponge and dabbed a good amount of the paint off as I wanted only a slight shading/tinting to be seen over top.  I really like the images as is and was quite happy with how this one turned out.  I consider it done!  Here are a few close ups for you...


Like the monochromatic idea, I thought I would try a repeat with 'greens' and using my Dina's again - I dung out all my greens. Hmmm - did you know she only had two (Lime & Evergreen)? I guess I could have used Ocean again but of course didn't think of it until after!

I used Super Heavy Gesso (White) to cover a base I wasn't happy with and went at it with a palette knife as I wanted some good texture.  It almost gives it a plaster look which makes me happy!


Additional colors used were - White, Black, Elephant & Umber 


Once again, I got carried away and did not take as many process pics along the way, but I am sure you can figure it all out easy enough. All these Stencil Girl stencils are from design Seth Apter.  I wanted to use a bunch of 'words' and marks. He has a great selection on their site.


Another tip for you as you are layering multiple stencils this way is to continuously turn, rotate, and flip your stencils.  As you lay them on your page, look for 'empty' spots and apply the colors there.  Offset your layers with another color to create shading or highlights.  


In this case as I had limited colors, I chose to mix some right on my mat with my sponge applicator.  I find Dina's color 'Elephant' a bit too translucent so I tend to make my own grey with white and black (usually gesso, as I find it has better coverage - especially if coverage is what I am after). 


Here are a few close ups so you can see all the layers and the interesting colors I was able to achieve simply with the limited palette I had.  I would say that Lime has always been one of my favorites, but when mixed with Umber...YUM!


I think that is good for today, I've (hopefully) kept you here long enough!  I will work on a few more posts over the next couple of days to share more of what I have been doing.  Don't forget to keep an eye on my Instagram and Facebook accounts (and I'd love it if you would follow along) as I tend to post there more often (just not as much detail)!

Most products are linked to my online store W2 Scrapbooking & Mixed Media Art Studio and if I don't carry it, I will usually link to where you can find it.

until next time...

That Other Neutral Triptych

  That Other Neutral Triptych wrapped canvases 10x10x1.5" (x3) professional grade artist materials I worked on this smaller series at ...