Showing posts with label weekend junket 2016. Show all posts

Friday, November 25, 2016

Weekend Junket #24

Welcome to our last set of prompts for this years Weekend Junket series.  I hope you have enjoyed these and that you were able to make use of these for your artsy adventures.

This week I am actually making the time to work on the final set of prompts, I hope your enjoy it...


#w2wj24

color medium: Prima's Frank Garcia Memory Hardware Powders
product focus: graphite paper
curveball:  use an unusual (to you) substrate as a base


So where does one start when asked to use something unusual to 'me'?! There are not many items out there that I haven't put art on in one way or another, so I took a stroll through the shop to see what I could find...I kept coming across some sort of canvas, so I pulled out a sheet of printed canvas that was in the Clearance bin - Prima's Donna Downey Studios Poppies & Peonies Printed Canvas Poppies 1 and went to work!

You can see the goodies all out here to play with - the Canvas sheet (my curveball), my Frank Garcia Memory Hardware Powders and the Graphite Paper!


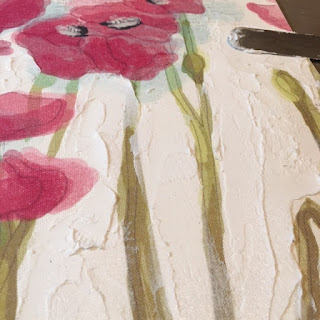
I started out trying to create some texture on the base using Golden Coarse Molding Paste as I knew I wanted to add color here at a later time (once dry). Coarse Molding Paste is a thick, soft white colored medium, translucent when applied thinly (otherwise will be opaque). It dries to a hard, stiff but flexible base with the tooth similar to a fine sandpaper. It takes on wet and dry media easily. It can be mixed/tinted to create dense paints that holds good peaks and dries to a matte or satin finish with a finely pebbled surface, perfect for this process (I hope)!


Now that it was fully dry, I took some of the Memory Hardware Powder in Rosewood, shook it on my craft mat and picked it up using one of my brushes. 


I was finding it too dark, even after spraying it with water, so decided to go in a different direction.


I pulled out the Coarse Molding Paste again, and decided to mix them together.


Again, wasn't happy with it until I really started applying heavy layers with the Palette knife.  I tried to apply it only to the darker areas of the printed sheet - this was taking on a 'paint by number(ish) feel to it and I was finding it a tad amusing!


Once I was happy with the Rosewood application, I did the same using the French Sage colored powder.


I didn't worry about staying in the lines as much, as I wanted to it take on the original watercolor look but with texture!


Now it was time to add some more color to the poppies.  I pulled out DecoArt Media Fluid Acrylics Quinacridone Gold and my brush and started applying it.  


Found that it was again darker than I wanted so I gave it a good dose of water and pulled the paint into the water on the sides to dilute even more as I went along.  I added water as needed to dilute even more so it lightened as I went.


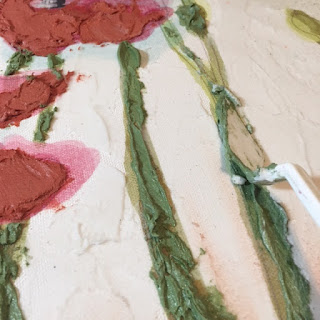
Now it was time to tackle the stems!


I again pulled out from the DecoArt Media Fluid Acrylics line, this time in Green Gold (and we all know how much I love this color) and repeated the same process.


I missed taking photos for this one, but I took the DecoArt Antiquing Cream in Patina Green (teal), and sprayed with a good amount of water.  I placed it in areas then sprayed it heavily with my spray bottle of water and moved it around.  Really made sure I got it on the textured areas I had created earlier with the Coarse Molding Paste.  It is looking great don't you think?


Now it is time for some Graphite Paper...

I first attempted to draw detail lines on the flowers, but they did not show up very well. 


So I decided to 'scribble' on the canvas in areas where there was no new applications.


That worked!


Here you can see where I really traced over and over trying to get the lines...


I gave up and moved to a Stabilo All Pencil in Graphite.


I sketched in and around the canvas then sprayed it heavily and blended with the pencil itself again.


Now I pulled out my Speedball India Ink and a Pipette to mark in the centers of the poppies and add a few splatters on the canvas itself.


Finally I added the white using Golden High Flow Titanium White in a bottle with Fineline Applicator. You could also use a paint pen or even enamel dots.


There you have it! My final Weekend Junket for 2016!  


I truly hope you have enjoyed these and hope you will join me again in 2017 for something a little different! Don't forget to click on the tab above as it will have links to all the past prompts for 2016.  I am also creating a PDF with all the prompts and links on one handy sheet.  If you would like one of these, please send me a email or comment below and I will get to to within a few days.


Friday, November 11, 2016

Weekend Junket #23


#w2wj23

add character - write out the words to your favorite song on your page
product focus - acrylic inks
technique - cover words with transparent tissue papers or other fibrous papers

I don't know about you, but when I listen to music I do not usually actually 'listen' to the words.  I am more of a music (tune/melody) kinda girl.  I may sing along with it, but honestly I know I usually do not really comprehend what  the song is about let alone what the singer is actually singing at the time. The song I choose to write out this week did however catch a few lines that really stayed with me. There were many words and phrases I tend you use on myself and others. 

I often get a kick out of going to lyric sites and seeing what the words actually are. If I am still intrigued, I will go to YouTube and see if there is a video of it as often there are descriptions by the artist depicting what the song is actually about.

Have some fun with this one, go to your playlist and see what song you tend to listen to over and over again; one that has the highest play count on it; one that have amazing (or even tough) memories of.  Write it out - READ it, SING it - then take it to the next level...cover it up! Then add some color and brighten it up!

Here is a quick process of what I did...

In my handmade Urban Journal on a sheet of Ranger Inkssential Manila Cardstock, I wrote out the words to my song,


Next I took some of my Hazel + Ruby Tissue Paper (Quote Collage HR-TR345) tore off some random pieces and prepared to adhere it down using Gel Medium. As you can see from the photo, I also used a paper doily (why not)!


Once is was (kinda) dry, I doodled a few flowers onto it. Yes I know, I am a tad impatient.


Now it is still wet as I type this (because as usual, I am running behind).  I will need for it to dry now before I start on it with my Daler Rowney FW Acrylic Artist Inks. If I use them now, everything will just bleed.  So for now I wait!

On a positive note, I am writing this Thursday night, so technically, I'm ahead of the game!  Time will tell if I get to posting the next photo's before this blog post goes live.  If you see this, time was not on my side!

Have a great weekend - only one more Weekend Junket to come! See you for the last one November 25!

Friday, October 28, 2016

Weekend Junket # 22


#w2wj22

color medium - ink pad
curve ball - incorporate PLAID into your project
texture - embossing plate

Wow - welcome and goodbye October!! Not sure how that all went by so fast - but yup...it is more than less...gone!  I had such high hopes for this month and getting my sample done for you.  So do you think getting it half done or so counts?

This past week has been a gong show with so much going on and then my mother in law having surgery and having to help out there where I could. I was lucky if I got an hour a day in the studio.

Here is what I did get done using this week's prompts...

I am going a bit literal on this one...to start! I am using my homemade journal this time around and the page size is approx 7x9".  Here is my color palette.

I pulled out a sheet of plaid paper and cut it in random strips widths.


I then weaved it into yet another plaid! I simply laid it out on my non stick mat, then transferred it over to my page when I was ready.


I adhered it down onto my page using matte medium.


Trimmed to fit!


I used some Light Modeling Paste and spread it out on the outer edge...


I decided to use one of my Sizzix  Embossing Folder as a texture plate (thanks for the idea Barb)!


Ya, that didn't work out too good!


So let`s smooth it over and try again... 


Ya, still no go!


That`s okay, I had a plan!  I smoothed out again, and made sure I did not have too much modeling paste and then let it sit for about 30 minutes before pressing the texture fade into it...
SUCCESS!!


I let it dry overnight, then inked it up using Ranger`s Archival Ink by Wendy Vecchi in Forget-Me-Not.


Thinking it was not enough, I pulled out on of my old faithful foam stamps by Jenni Bowlin Studio`s called Whimsical and added some more color.  I once again used Ranger Archival Ink`s Wendy Vecchi series (Cornflower Blue).


I was finding it a tad blah, so I added some of my Ranger Adirondack Color Wash Sprays (Butterscotch).


Moved it around with some water from a mister


Dried it it with my heat tool and sadly this is where it stands for now!


I really like the colors on this one - and am thinking a silhouette of some sort on the left and some words (either stamps or stencils) will be added when I can.

Only TWO more Weekend Junkets to come!  I hope you have been enjoying these and are able to take inspiration from the prompts (especially since I have been so horrible in getting samples completed ahead of time for you)!  Don`t forget to share your projects using the hashtag (`#` shown at the top of each post) on social media...you never know when a prize might pop up!


That Other Neutral Triptych

  That Other Neutral Triptych wrapped canvases 10x10x1.5" (x3) professional grade artist materials I worked on this smaller series at ...