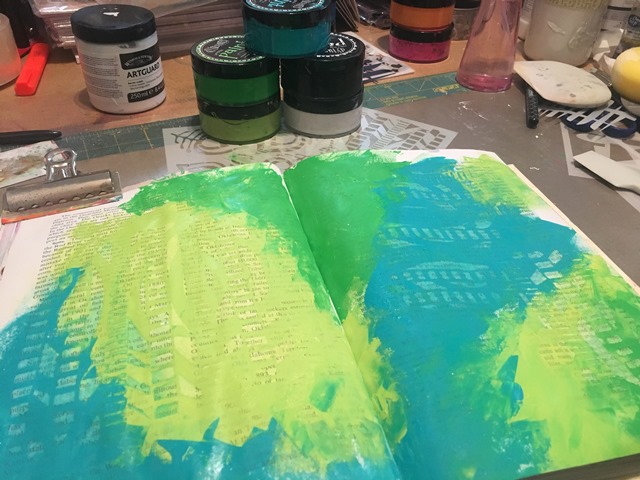
#23 - Simple
Color palette - Lemon Zest, Fresh Lime & Cut Grass
I started out applying a base of White Linen using my key card, then layering on the colors in the order given above (lightest to darkest). Note - I only used the edge of the key card for the cut grass application - here, I dipped it into the jar and placed it onto the journal page.
To get the marks in the paint, I used a drywall palette knife that has a zigzag edge and simply scraped it across the page.
The black "x's" are made with my Black China Marker. As simple as the page is, it is one of my favorites!

#24 - Primary
Color Palette - London Blue, Lemon Zest & Postbox Red
I pulled out the primary colors from the Dyan Reaveley Dylusions paints (listed above) and if you can believe it - those are the only paints I used to create 'color' - yup, because as you know...
blue + yellow = green
yellow + red = orange
So when I applied the three base colors I made sure I only applied them on their own and fairly thick. So when it came time to bring them together. I used my key card and brought the colors towards each other and therefore mixing them and creating the new 'secondary' color.
When they were dried, I took a StencilGirl Classic Leaf stencil by Rae Missigman and applied it to each color with my White Linen paint. Then when it was all dry - scribbled over them all with my Ranger Fude ball pen in Black.


That's it...that's all! Slightly bummed my White Linen is now ALL DONE! So all future white will have to be gesso.

#25 - Hidden
Color Palette - Lemon Zest, Squeezed Orange & Postbox Red
Applied my paints using my Catalyst Mini Blade and once it was dried - I applied DecoArt Media Black Antiquing Cream (you could simply use the Carbon Black if you want too). I like to use the Antiquing Cream as it is never permanent until sealed (which at times can be a curse). Once the paint was dried, I put on my StencilGirl stencil Tropical Floral by Traci Bautista.

I moved the stencil around quite a bit, turned it, flipped it, moved it to where ever I thought it might fit. Don't be afraid to overlap it too - stencils are best used in a collage form in my opinion! Don't be afraid to create your own patter(s) along the way.
You can also see I used my Liquitex Paint Marker and Gelly Roll pen (both in White) to 'trace' the patterns as well as enhance many of them.

here are some more pictures so you can take it all in...


#26 - Singular
Color Palette - Vibrant Turquoise, London Blue and Crushed Grape
Again, sorry for the lack of progressive photos - but think you should be able to figure this out easy enough. I as usual, applied the paint using my Catalyst Mini Blade. My pattern is usually pretty much the same as far as where on the page it is applied (as in pattern), just look at earlier ones and you are able to see it fairly clear. I often try to get three colors per page.
Once this was dried, took a piece of Vine Charcoal and drew out my pattern. I have a real love for anything botanical and this seems to be my go to (just look at my sketch books)!
I at first tried to use my blade to apply the gesso, then quickly switched to using my fingers. I find it much easier to blend and get a better 'uneven' coverage (odd isn't it, not something you would normally want in painting). I don't really worry about the charcoal smudging with the gesso, just think of it as 'shading' for free (or paint over it)! I really like how the paint bleeds through the gesso - gives a marble look - love it!
As it dries - I use my Ranger Fude Ball pen to define the image.


Add the Gelly Roll White Pen in where needed as well.


Add a few marks in the corner with the Fude ball as well. That's it...that's all! Love the simplicity of this page.

#27 - Continuous
Color Palette - Lemon Zest, Squeezed Orange & Melted Chocolate
This is a palette I avoided way too long - but once I got going o it....man I wish I pulled it out earlier! Saying this is rich looking is an understatement! If you have the Dyan Reaveley DyluisonssMelted Chocolate....pull it out and USE IT!!
After applying the paints with my Catalyst Mini Blade, I pulled out some of my vintage map pages and cut up a sheet in two continuous circles. To get the four circles, I cut the first one keeping thick lines and then go in again and cut the lines in half and voila - you get two identical (kinda) continuous loops. I adhered them to the page using Traci Bautista Collage Pauge Matte. As mentioned in an earlier post - this stuff is awesome. If dried 'flat' and takes pens, markers and such beautifully. Since I started using it, I haven't wrecked a pen/marker! The main reason (aside from the finish), I allow it to DRY!!
The black marks are made by my Ranger Fude Ball pen and the white is the Liqutex Paint Marker.


#28 - Painterly
Color Palette - Cut Grass, Vibrant Turquoise and London Blue
Struggled with this one - just couldn't get to a happy place with my blending. I applied it as usual with the Catalyst Mini Blade, but this time I blended with my brayer. Happy with the green, but not the rest. Really liked this color combo - just think now looking back it would have been better on a larger canvas.
Wanting to keep it simple, and not over think it, I tried to define the breaks with a 'river' of black and white (pens used - Fude Ball, Gelly Roll, Paint Markers)

I used the Fude Ball to write along the line after I was happy enough with the blending of my lines. Makes me think of a map now.


#29 - Confined
Color Palette - Squeezed Orange, Postbox Red & Melted Chocolate
This color palette is so dreamy!! Again, wishing I pulled out the brown so much earlier!
Once again, I applied the base colors with my Catalyst Mini Blade and blended with my brayer. The look is leather like (love it)!

I used a combo of Liquitex Paint Markers and Lyra (or Caran D'Arche) water soluble crayons trying to stay with the color palette just adding a pop of color here and there (white & yellow) when needed.


Just kept building layers of marks until I thought it was enough. Not a fave, but do like the colors...just not the pattern as much.

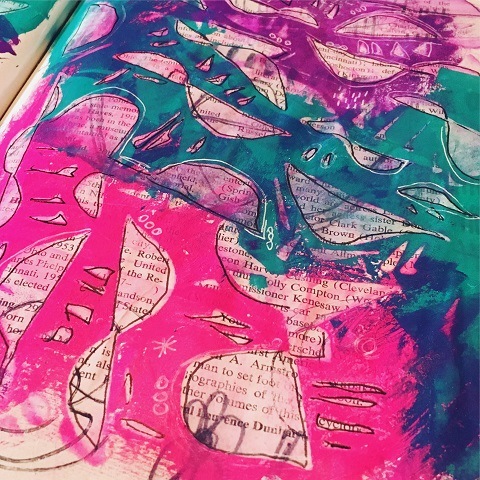
#30 - Shiny
Color Palette - Bubblegum Pink, Postbox Red & Crushed Grape.
Wanting to keep this one on the bright side, I was happy to pull out the more vibrant colors this time around.

For my mark making this time around I pulled out some of my Elmer's Neon Brights Painters along with my Liquitex Paint Markers to keep it bright and vibrant.

For the finer details, I used my Gelly Roll Pen in White.

Love how it turned out and more than happy with the end result. Not to mention that I actually completed a project/challenge from start to finish!! Yay Me!!

Hope you enjoyed all these. I haven't had time to really do anything since this challenge. Between the shop, year end, household, family and life in general it has consumed all my time. I really hope to get the chance to play again real soon - guess I may have to schedule it in....
Have a great day everyone, and thank you for stopping by....
Many of the products shown here are available on the site and can been found following the links or to just browse, head to the shop HERE!