Showing posts with label art challenge. Show all posts

Wednesday, May 10, 2017

Proof of a Creative Weekend Part I

Had a great weekend with my girls, three nights/four days of creative bliss!  Well, let's say I had two full days of creative bliss- the first night I was just not feeling it.  Once I unpacked, I looked at my table and went...nah.  So headed to the couch area and chilled with a bottle of wine, the hockey game and a few other girls that were in the same boat as me!

My goal this weekend was to work on these prompts from Rae Missigman's Art Marks 30 Day Challenge. As you can see from the picture, I didn't get near as many completed as I had hoped!


Woke up Saturday morning ready to go and did 7 prompts over the course of the day.  I was on a roll and am sorry to say I didn't not take many photos along the way.  I will do my best to list the products I used.

Prompt #1 - Clustered

I started out thinking I would just used gelatos, distress crayons &/or Art Crayons as my go to tools for this challenge.  I didn't last long.  I didn't like how they where mixing with my stencils, so out came my Dina Wakley Media Heavy Body Paints!  They make me happy.  I applied White using a keycard and really scrapped and scratched them into the base I had already started, it gave a muted look which I was happy with.  I them started pulling out some of my StencilGirl stencils (S330 Modern Buds, M080 Repetition S376 Hashmarks) that I figured would work for this prompt.  I used Lemon, Ruby & Night.  Once the colors were dry, I used my Sharpie Extra Fine Point Marker to make some marks (doodles and scribbles) along with my Pilot MultiBall Pen.  I do not carry these in my shop, but a good substitute is the Fudeball or UniBall in black.


Prompt #2 - Repeating

This next one I really struggled with and am really not happy with, but as you all know, I tend to just turn the page instead of worrying about a page too much....this is one of those pages!  I used Dina's paints in Magenta, Sky & Elephant.  The colors look off as I did not clean the stencil or the sponge after each application.  The stencil is from Carabelle Studio, Edge Template - Rounder (TEE0005). I then created a repeating pattern with one of my black markers.  This is the point when I simply decided to turn the page and move on.
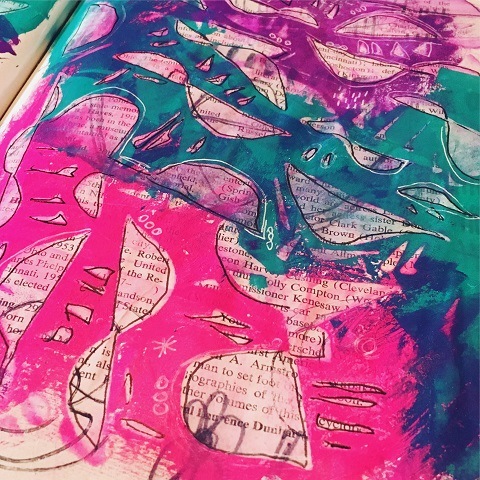

Prompt #3 - Layered

This has many many many many and yes, many layers of paint and stencils.  I used more StencilGirl stencils in circular pattens and used a different color for each.  I started with Lemon, then went to Lime, then Magenta, Tangerine, Blackberry Violet and finally Night. The Blackberry created a bit of mud in areas, so I used White and rubbed it in with my fingers to soften it up in areas before I started my doodles. I doodled using my Sharpie Extra Fine Point in White and then a Pebeo 4Artist Marker in Black & Green. The fine doodles are of course the Pilot MultiBall.


Prompt #4 - Stacked

This one was a blast! I actually stacked stencils on top of themselves then applied the paint through what pattern it created.  Thankfully I actually took a few more photos of this one along the way.  Each time I used a color I either switched the stacking sequence or added another stencil. I used Dina's Lemon, Ruby & Black. Stencils were Crafter's Workshop (TCW547 Repeating Pods), StencilGirl (#L301 Circles Circles ) and Dyan Reaveley (sorry, will have to dig it out and find the product number).


Here I added for a finishing (almost) touch is another Crafter's Workshop stencil - Art Is in 6x6" then again just added some more black.  Really like how it completes the layers...oops, I mean stacks!


Thinking the page needs some pop, so I used the Sharpie Fine Point in White and Pebeo 4Artist Marker in Yellow to doodle a few of the patterns, happy with it and moving on!


 Prompt #5 - Round

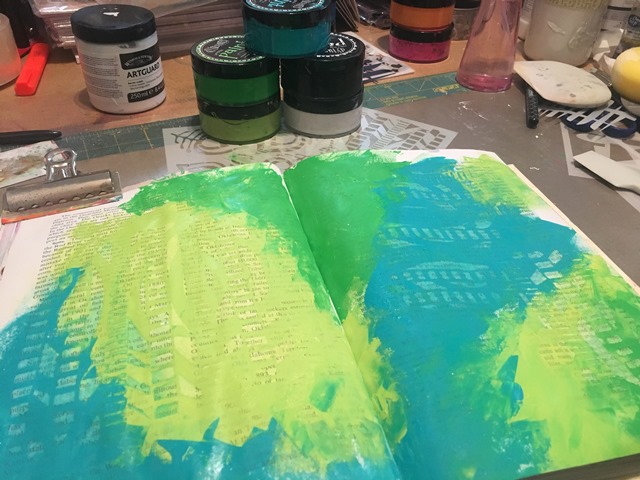
For this one I really wanted to go out of my comfort zone and go more towards the pastel palette.  I used a fair amount of gesso so it was a good base of white and when I apply the Dina paints with a sponge through the stencils they tend to take on a pastel look.  I used the Crafter's Workshop stencil Positivity (#TCW687) with the following paint colors - Lime, Magenta, Lemon and Turquoise.
It was a little to blah for me, so I added some punched pop dots that I downloaded from Roben Marie's site and glued them down.  Once everything was dry, I began to doodle.  Again, using my Sharpie, UniBall, Pilot MultiBall &/or 4Artist pens/markers.


Prompt #6 - Black & White

For this one I used a stencil from StencilGirl called Circle Web (#L404), I gesso'd by page in white then applied a good coat of Dina's black paint with a craft sponge so it was very dark. Then I lifted the stencil and spritzed it with water and laid it face down on the opposite page.  The areas that did not come through I simply filled in with a black marker.  Once it was all dried, I used the White Sharpie on the black and the Stabillo All Graphite pencil on the white.  blended with my wet finger and called it done.  It was a pretty quick page and really like the results. 


Prompt #7 - Arrow like

For this one I once again used a variety of stencils - Crafter's Workshop stencils (TCW227 Chevron, TCW687 Positivity) along with StencilGirl (M077 Look Here Trio) and used Dina's Lemon, Ruby & Black for colors.  It was very dark and busy so I ended up adding white gesso over top that I simply applied using my finger just covering up in certain areas to create a look I liked in the end.  I then added doodles using my usuals - Sharpie, Pebeo & Pilot MultiBall.


That's it for Saturday - will do my best to get back on here tomorrow for Sunday's creations.  There were some good ones!

For now, thanks for sticking around - be sure to follow the links back to the shop for items used on these pages.  Have a great day and stay creative!!

Monday, March 6, 2017

Up Close and Person with #artmarks30daychallenge the final week!

Hope you have been enjoying these posts all about the ins and outs of my take of the month long challenge hosted by Rae Missigman.  My apologies right off the top as there will be a shortage of photos for many of these prompts as it appears I just didn't take that many!  I will do my best to give you a good enough explanation to recreate if you wish.  Here we go for the final 8 prompts...

#23 - Simple

Color palette - Lemon Zest, Fresh Lime & Cut Grass

I started out applying a base of White Linen using my key card, then layering on the colors in the order given above (lightest to darkest). Note - I only used the edge of the key card for the cut grass application - here, I dipped it into the jar and placed it onto the journal page.

To get the marks in the paint, I used a drywall palette knife that has a zigzag edge and simply scraped it across the page.

The black "x's" are made with my Black China Marker. As simple as the page is, it is one of my favorites!


#24 - Primary

Color Palette - London Blue, Lemon Zest & Postbox Red

I pulled out the primary colors from the Dyan Reaveley Dylusions paints (listed above) and if you can believe it - those are the only paints I used to create 'color' - yup, because as you know...

blue + yellow = green 
yellow + red = orange

So when I applied the three base colors I made sure I only applied them on their own and fairly thick.  So when it came time to bring them together. I used my key card and brought the colors towards each other and therefore mixing them and creating the new 'secondary' color.

When they were dried, I took a StencilGirl Classic Leaf stencil by Rae Missigman and applied it to each color with my White Linen paint.  Then when it was all dry - scribbled over them all with my Ranger Fude ball pen in Black.


That's it...that's all!  Slightly bummed my White Linen is now ALL DONE!  So all future white will have to be gesso.


#25 - Hidden

Color Palette - Lemon Zest, Squeezed Orange & Postbox Red

Applied my paints using my Catalyst Mini Blade and once it was dried - I applied DecoArt Media Black Antiquing Cream (you could simply use the Carbon Black if you want too). I like to use the Antiquing Cream as it is never permanent until sealed (which at times can be a curse).  Once the paint was dried, I put on my StencilGirl stencil Tropical Floral by Traci Bautista.


I moved the stencil around quite a bit, turned it, flipped it, moved it to where ever I thought it might fit. Don't be afraid to overlap it too - stencils are best used in a collage form in my opinion! Don't be afraid to create your own patter(s) along the way.

You can also see I used my Liquitex Paint Marker and Gelly Roll pen (both in White) to 'trace' the patterns as well as enhance many of them.


here are some more pictures so you can take it all in...


#26 - Singular

Color Palette - Vibrant Turquoise, London Blue and Crushed Grape

Again, sorry for the lack of progressive photos - but think you should be able to figure this out easy enough.  I as usual, applied the paint using my Catalyst Mini Blade.  My pattern is usually pretty much the same as far as where on the page it is applied (as in pattern), just look at earlier ones and you are able to see it fairly clear.  I often try to get three colors per page.

Once this was dried, took a piece of Vine Charcoal and drew out my pattern.  I have a real love for anything botanical and this seems to be my go to (just look at my sketch books)!

I at first tried to use my blade to apply the gesso, then quickly switched to using my fingers.  I find it much easier to blend and get a better 'uneven' coverage (odd isn't it, not something you would normally want in painting).  I don't really worry about the charcoal smudging with the gesso, just think of it as 'shading' for free (or paint over it)!  I really like how the paint bleeds through the gesso - gives a marble look - love it!

As it dries - I use my Ranger Fude Ball pen to define the image.


Add the Gelly Roll White Pen in where needed as well.


Add a few marks in the corner with the Fude ball as well.  That's it...that's all! Love the simplicity of this page.


#27 - Continuous

Color Palette - Lemon Zest, Squeezed Orange & Melted Chocolate

This is a palette I avoided way too long - but once I got going o it....man I wish I pulled it out earlier! Saying this is rich looking is an understatement!  If you have the Dyan Reaveley DyluisonssMelted Chocolate....pull it out and USE IT!!

After applying the paints with my Catalyst Mini Blade, I pulled out some of my vintage map pages and cut up a sheet in two continuous circles.  To get the four circles, I cut the first one keeping thick lines and then go in again and cut the lines in half and voila - you get two identical (kinda) continuous loops.  I adhered them to the page using Traci Bautista Collage Pauge Matte.  As mentioned in an earlier post - this stuff is awesome.  If dried 'flat' and takes pens, markers and such beautifully.  Since I started using it, I haven't wrecked a pen/marker!  The main reason (aside from the finish), I allow it to DRY!!

The black marks are made by my Ranger Fude Ball pen and the white is the Liqutex Paint Marker.


#28 - Painterly

Color Palette - Cut Grass, Vibrant Turquoise and London Blue

Struggled with this one - just couldn't get to a happy place with my blending. I applied it as usual with the Catalyst Mini Blade, but this time I blended with my brayer.  Happy with the green, but not the rest.  Really liked this color combo - just think now looking back it would have been better on a larger canvas.  

Wanting to keep it simple, and not over think it, I tried to define the breaks with a 'river' of black and white (pens used - Fude Ball, Gelly Roll, Paint Markers)


I used the Fude Ball to write along the line after I was happy enough with the blending of my lines.  Makes me think of a map now.


#29 - Confined

Color Palette - Squeezed Orange, Postbox Red & Melted Chocolate

This color palette is so dreamy!! Again, wishing I pulled out the brown so much earlier!
 Once again, I applied the base colors with my Catalyst Mini Blade and blended with my brayer.  The look is leather like (love it)!


I used a combo of Liquitex Paint Markers and Lyra (or Caran D'Arche)  water soluble crayons trying to stay with the color palette just adding a pop of color here and there (white & yellow) when needed.


Just kept building layers of marks until I thought it was enough.  Not a fave, but do like the colors...just not the pattern as much.


#30 - Shiny

Color Palette - Bubblegum Pink, Postbox Red & Crushed Grape.

Wanting to keep this one on the bright side, I was happy to pull out the more vibrant colors this time around.


For my mark making this time around I pulled out some of my Elmer's Neon Brights Painters along with my Liquitex Paint Markers to keep it bright and vibrant.


For the finer details, I used my Gelly Roll Pen in White.


Love how it turned out and more than happy with the end result. Not to mention that I actually completed a project/challenge from start to finish!! Yay Me!!


Hope you enjoyed all these.  I haven't had time to really do anything since this challenge.  Between the shop, year end, household, family and life in general it has consumed all my time.  I really hope to get the chance to play again real soon - guess I may have to schedule it in....

Have a great day everyone, and thank you for stopping by....

Many of the products shown here are available on the site and can been found following the links or to just browse, head to the shop HERE!

Sunday, March 5, 2017

Up Close and Personal with #artmarks30daychallenge - Week 3

Sorry for the delay in getting these out - to say I have been busy is a serious understatement!  But you don't care about that - you just want to see some inspiration....here you go!

#15 - Loose

My color palette of choice today was Lemon Zest, Postbox Red and Vibrant Turquoise (and of course White Linen & Black Marble).  I used my Catalyst Contour Tool to apply the paints and make my marks.


Used my Liquitex Paint Marker (White) to create the boxes around the openings and wrote out my verse in Gelly Roll Medium Point Pen (white).


This page from start to finish took me 15 minutes - simple but fun and very rewarding to get it done.


#16 - Assorted

Color Palette of Dyan Reaveley Dylusions was Lemon Zest,  Squeezed Orange and Postbox Red. I used my Catalyst Mini Blade Tool to apply the paints.  Really like using this as I get wonderful blending of colors.


The other great part of the any of hte Catalyst tools is that you can use for your making your marks as well.  In this one, I used the Taupe Contour Tool as it is firmer than the others (which are silicone).  Here are some close ups - love how I was able to blend this so seamlessly.


Making my marks this time with a mix of black and white pens (Fudeball, Gelly Roll, Paint Pens)


I also pulled out the We R Memory Keepers Sew Stamper Roller set to see if I could save the page as I was not happy with where it was going.


There was some book papers on my desk so I decided to use them in hopes of starting to like my page!  I simply free cut them and started adhering them onto the page.  I them marked them up with my Fudeball.  I also added some more white - yup, now I like it again!

Here are some close ups... 


#17 - Reverse

Started out a bit literal on this one, wrote straight on the page using my Black Lyra Water Soluble Crayon - backwards  & with my left hand. I also used my Fudeball pen for the the finer marks.


I then pulled out my color palette for the day - Bubblegum Pink, Crushed Grape & Vibrant Turquoise and applied them once again using my Catalyst Mini Blade.  I missed a bunch of photos here, but you can see I used a StencilGirl Stencil by Rae Missigman called Harbor Side.  I just laid it on top of hte page while the paint was still wet and rubbed off the paint with a baby wipe.  This was you could see the book text underneath along with my marks from earlier.


I twisted, flipped and turned the stencil to get all the areas I wanted.


I then went in with my Black Fudebal and White Gelly Roll and sketched around and inside the stencil pattern on the page itself.


This is were I called it done.  I could have easily done a lot more, but that really defeated the purpose of the challenge.  I was trying hard to keep my pages simple and completed in less than 30 min (more often 15)!


#18 - Circular

My core palette today was going to be a bit dark (by choice) and aside from my usual addition of Black & White, my main colors were Vibrant Turquoise, London Blue and Crushed Grape.

I am lacking a lot of progression photos for this days prompt - which usually means I was on a roll (no pun intended)!

I used StencilGirl stencils - Retro Tiles Small, Seeds Doily and Rolls.  I have been applying the paint using a Sofft Art Sponge as I really like how the paint comes off it.  I get little to no seepage. 


#19 - Hashed

Color palette is Squeezed Orange, Postbox Red and Bubblegum Pink.  Applied using my Catalyst Mini Blade of course.  I started out applying some white as a base and then the colors on top.  Once dried enough, I laid out my StencilGirl Boundaries stencil and covered it with Black Marble using the Sofft Art Sponge.  I positioned the stencil across the center and overlapped where needed to get the image I was after.


Added a few scrape marks using the Catalyst Contour Tool in the somewhat wet paints and called it done!


#20 - Suspended

Color Palette was Fresh Lime, Cut Grass and Vibrant Turquoise.  I used my StencilGirl stencils again in Paste Paper to create the first layer by rubbing off some of the paint using a baby wipe.  


Then I started to layer it on again along with the Ornamental Peacock Feathers stencil using either White Linen or Cut Grass paints.  I also added the Kunst Mask 2 stencil with a pop of Black Marble.  Added some marks with my Gelly Roll Medium Point in White.


#21 - Bold

Color Palette was Vibrant Turquoise, London Blue and Crushed Grape.  Applied using my Catalyst Mini Blade.   


Using my StencilGirl stencil Kunst Mask 2, I used Black Marble paint and Sofft Art Sponge with the stencil and flipped it back and forth to create an interesting pattern. Then added some White Linen to  soften it up when and where needed.


Added marks with my Liquitex Paint Markers in  Black & White. and called it done!


#22 - Reflective

Struggled big time with this one and eventually had to just call it done.  Not a lot of photos on this one (hence the struggle).  My main color palette was Squeezed Orange, London Blue, Bubblegum Pink and Crushed Grape.  I used the Crafter's Workshop Tribal Fish stencil with white and black spray and was not happy with either.


After rubbing off as much as I could, I ended up using either a Fudeball/Gelly Roll or Paint Marker to make my marks and just call it done and turn the page.  


No use taking up an entire afternoon or evening with a page that just isn't coming together.  Learn form it and move on!  And that I did... 


Hope you enjoyed this weeks batch - I will try my darnedest to be back tomorrow with the last week of  the challenge! Thanks for sticking with me...


W2 Scrapbooking & Mixed Media Art Studio shop.

That Other Neutral Triptych

  That Other Neutral Triptych wrapped canvases 10x10x1.5" (x3) professional grade artist materials I worked on this smaller series at ...