Friday, November 25, 2016

Huge, HUge HUGE Sale!!


Be sure to head over to the main site this weekend for a massive blowout!

the entire site is 40% off until 11:59pm Monday, November 28!

Want some even better deals? Be sure to check out the Sale & Clearance sections as they too are included in the sale!

The small print of the sale:


The sale is effective 6:00 pm (MST) Thursday November 24 and goes straight through to 11:59pm Monday November 28, 2016.
  • INCLUDES all items on site, YES - even already marked down items (Sale & Clearance)
  • Does NOT included PRE-ORDERS or previous items put on hold
  • Discount will only be applied to minimum purchases (before shipping & tax) of $35.00
  • Free Shipping will only apply if you spend a minimum of $175.00 (after discount but before shipping & tax).
  • You MUST input the discount coupon code "blackcyber" (don't forget to hit the recalculate button when you input). 
  • DON'T FORGET: Discount Coupon Code - blackcyber
  • Shipping will commence Monday November 28.
READY,  SET - SHOP!

Weekend Junket #24

Welcome to our last set of prompts for this years Weekend Junket series.  I hope you have enjoyed these and that you were able to make use of these for your artsy adventures.

This week I am actually making the time to work on the final set of prompts, I hope your enjoy it...


#w2wj24

color medium: Prima's Frank Garcia Memory Hardware Powders
product focus: graphite paper
curveball:  use an unusual (to you) substrate as a base


So where does one start when asked to use something unusual to 'me'?! There are not many items out there that I haven't put art on in one way or another, so I took a stroll through the shop to see what I could find...I kept coming across some sort of canvas, so I pulled out a sheet of printed canvas that was in the Clearance bin - Prima's Donna Downey Studios Poppies & Peonies Printed Canvas Poppies 1 and went to work!

You can see the goodies all out here to play with - the Canvas sheet (my curveball), my Frank Garcia Memory Hardware Powders and the Graphite Paper!


I started out trying to create some texture on the base using Golden Coarse Molding Paste as I knew I wanted to add color here at a later time (once dry). Coarse Molding Paste is a thick, soft white colored medium, translucent when applied thinly (otherwise will be opaque). It dries to a hard, stiff but flexible base with the tooth similar to a fine sandpaper. It takes on wet and dry media easily. It can be mixed/tinted to create dense paints that holds good peaks and dries to a matte or satin finish with a finely pebbled surface, perfect for this process (I hope)!


Now that it was fully dry, I took some of the Memory Hardware Powder in Rosewood, shook it on my craft mat and picked it up using one of my brushes. 


I was finding it too dark, even after spraying it with water, so decided to go in a different direction.


I pulled out the Coarse Molding Paste again, and decided to mix them together.


Again, wasn't happy with it until I really started applying heavy layers with the Palette knife.  I tried to apply it only to the darker areas of the printed sheet - this was taking on a 'paint by number(ish) feel to it and I was finding it a tad amusing!


Once I was happy with the Rosewood application, I did the same using the French Sage colored powder.


I didn't worry about staying in the lines as much, as I wanted to it take on the original watercolor look but with texture!


Now it was time to add some more color to the poppies.  I pulled out DecoArt Media Fluid Acrylics Quinacridone Gold and my brush and started applying it.  


Found that it was again darker than I wanted so I gave it a good dose of water and pulled the paint into the water on the sides to dilute even more as I went along.  I added water as needed to dilute even more so it lightened as I went.


Now it was time to tackle the stems!


I again pulled out from the DecoArt Media Fluid Acrylics line, this time in Green Gold (and we all know how much I love this color) and repeated the same process.


I missed taking photos for this one, but I took the DecoArt Antiquing Cream in Patina Green (teal), and sprayed with a good amount of water.  I placed it in areas then sprayed it heavily with my spray bottle of water and moved it around.  Really made sure I got it on the textured areas I had created earlier with the Coarse Molding Paste.  It is looking great don't you think?


Now it is time for some Graphite Paper...

I first attempted to draw detail lines on the flowers, but they did not show up very well. 


So I decided to 'scribble' on the canvas in areas where there was no new applications.


That worked!


Here you can see where I really traced over and over trying to get the lines...


I gave up and moved to a Stabilo All Pencil in Graphite.


I sketched in and around the canvas then sprayed it heavily and blended with the pencil itself again.


Now I pulled out my Speedball India Ink and a Pipette to mark in the centers of the poppies and add a few splatters on the canvas itself.


Finally I added the white using Golden High Flow Titanium White in a bottle with Fineline Applicator. You could also use a paint pen or even enamel dots.


There you have it! My final Weekend Junket for 2016!  


I truly hope you have enjoyed these and hope you will join me again in 2017 for something a little different! Don't forget to click on the tab above as it will have links to all the past prompts for 2016.  I am also creating a PDF with all the prompts and links on one handy sheet.  If you would like one of these, please send me a email or comment below and I will get to to within a few days.


Wednesday, November 23, 2016

I was {ART} Challenged!

Last week I received a wonderful little package from a friend in the states - Kim (@jadesuttonart on Facebook and Instagram) sent me a little something because she saw it and thought of me and wondered what would Wendy do?

It always makes me smile when friends think of me - especially when it comes to anything artsy! Kim sent me three bundles of colored gauze (black, white & grey). It didn't take me long to get inspired for this one (which turned out to be plural - ones), wonder what I did? Here you go...


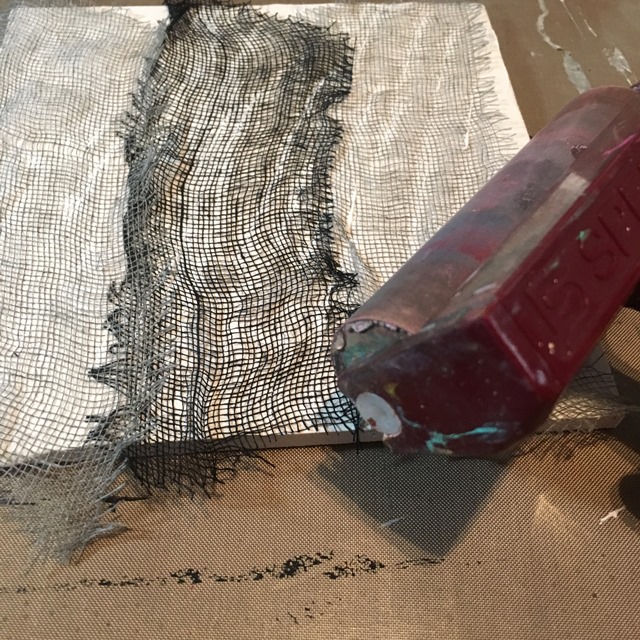
I pulled out one of my 12x12" homemade cradled boards (mdf topper) and go to work!  I used Prima's Finnabair Art Basics Heavy Gesso (sorry, sold out in the store, I wonder why?) in White and my faithful (and you all know favorite) Palette Knife.


You can see I decided to switch to my Catalyst Wedge to apply the gesso (oops)! I put a good coat on, but not enough to bleed into the gauze, just enough to allow it to grab and act as the glue.


Started out with the grey and layered it across the top.


Next came the addition of the black, repeating the same process. 


Then I added the white crossing over where they met. 


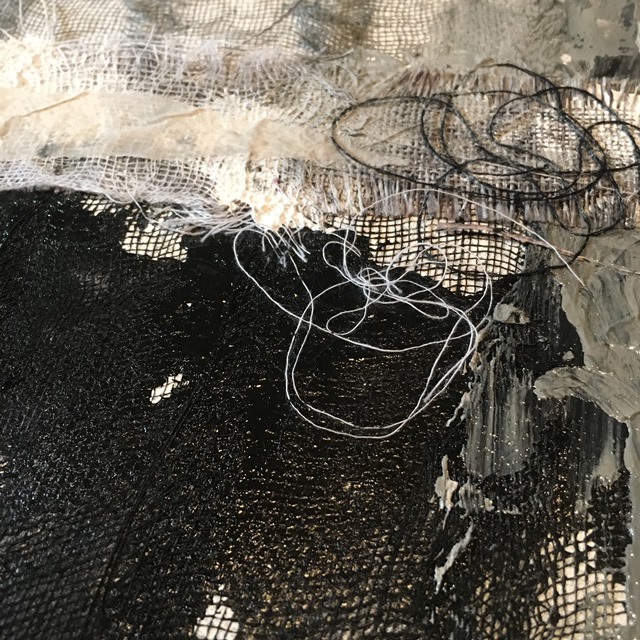
I had random threads of fiber that had come off the gauze so of course I included them as well along with some other fibers from the shop.


Once it was somewhat dry, I ended up pulling off the center fibers so I could now used my palette knife to scrape and drag Prima's Finnabair Heavy Gesso in Black over the black gauze and Some Grey paint (mixed with Heavy White Gesso) over the grey gauze.


Now it was time to start adding he fibers I had taken off previously.  This is a favorite of mine to use from the shop.  It is Linen Frayed Burlap in Smoke color (made by Maya Road)


I put some random swipes of the Heavy White Gesso to hold down the burlap fiber and the layer of White Gauze on top of it.


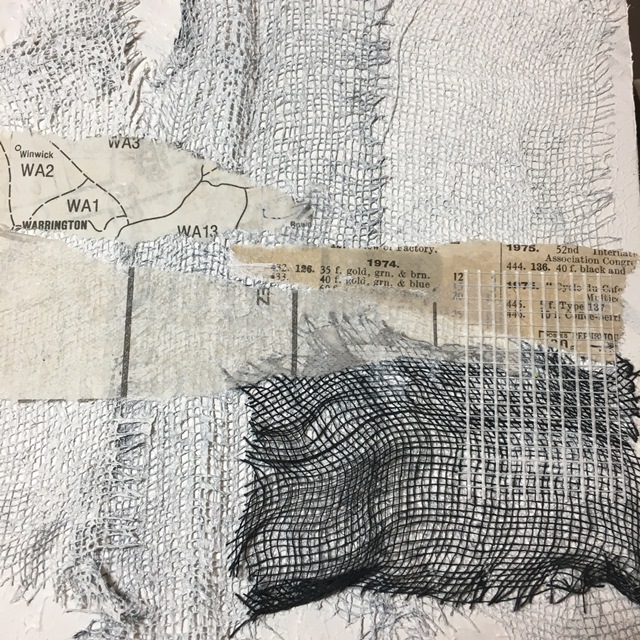
Not liking how it looked on it's own, I added a random torn piece of vintage pattern tissue from my stash...


...making sure that the various random threads where placed strategically (haha).


here are a few close ups...


As this one needed to dry I thought I would pull out some one (or two) of my 6x6" mdf panels and try some more (heck, why not?!).  Again, it started out with Prima's Finnabair Art Basics Heavy Gesso in White (yes, I used my palette knife)! I applied a fairly heavy coat (maybe venture to say too much).


Laid grey and black on it....


...then thought I'd use my brayer in embed it into the gesso.


Yuppers,  a tad too much gesso - kind of looks like the making of a cast doesn't it?! So more black was added!


Along with some vintage papers from my stash.


So what did I do, I started a second 6x6" to add to the 'series'. One is great, two is better, three is even more better, right?


I then added some of the vintage pattern tissue to help tie them all together.  Here are some close ups of each...


Now it was time to add even more texture, so I pulled out some drywall tape (mesh) and cut off random strips to add to each piece. 


Now that they were dried, this was my next step - addition of Dorland's Wax!


I mixed each of the 'colors' previously used with some Dorland's Wax. 
 

I started with grey and scrapped it on with my catalyst tool, really working it in.  Not worrying if I tore or moved the gauze.


Next was the Black, same process.


Then White.  Some areas I would really pull back the wax mix as I wanted the lower layer to show through.


I had lots of extra wax mixes left, so I pulled over the larger 12x12" board to work it in there too.


I allowed it to dry for over 24 hours as the wax takes quite a while to set.  You can't see in any of the photos, but there are some scrapes in the wax that I made with different tools (stylus, edge of my catalyst tool and pen nib).  I thought I would try a glaze now, really having no idea if it would work, but thought what the heck - why not, it's Wednesday! I tried it on the 6x6's only (so far). 


Mixed up a batch of Golden Acrylic Glazing Liquid (Satin) and DecoArt Media Fluid Acrylics Titan Buff and brushed in in pretty hard with my Dina Wakley Media Flat (1") Brush.


I allowed it to set for about 2 minutes, then went after them with baby wipes and scrubbed off hard in some places more than others as I wanted the black & grey to especially show up still.


I added one more touch with my We R Memory Keepers Sew Stamper Set (Straight Stitch).


I have not done any more with these (or the 12x12") one yet as I am not sure if they are 'done'! I still have quite a bit of the gauze left that Kim sent, and have a few more ideas on how to use it.  Thanks you Kim for thinking of me - thinking it might be my turn to send you something to see what you will do this time!!

To see Kim's creative genius, please check her out here:


Kim was also a featured artist on Ranger - check it out here!


Until next time my friend....


That Other Neutral Triptych

  That Other Neutral Triptych wrapped canvases 10x10x1.5" (x3) professional grade artist materials I worked on this smaller series at ...