Showing posts with label prima. Show all posts

Friday, September 22, 2017

When Collage and Stencils Collide

This is by no means anything new, just new to me.  I was inspired by an image I had seen of MaryBeth Shaw of Stencil Girl Products (shared it way way back on my FB page) where she created a pattern using stencils with  the pattern - clear as mud right?  Ya...cause that is about how I remember it and how I decided to go with it and of course add my twist to it by using collage papers as well.

So come along with me as I try and steer you through my creative thought process.

I was o a monochromatic kick for this one and must say, quite enjoyed the process - not to mention the colors I decided on...Martha Stewart's Multi-Surface Satin Paints in the following colors: Lake Fog, Surf, Pool, Beetle Black & Beach Glass.  


I picked out some Dyan Reaveley Stencils including Directions, Fresh Dots, Old School Alphabet, and Donna Downey's stencil Circles & Stripes (#DD-081).  I was careful to keep the stencil images with the lines I had created on my sheet (12x18" Watercolor sheet).  I used my Fudeball pen to freehand the pattern (note the prettiest, but it worked).  I applied the paints using a makeup sponge wedge, being careful not to apply too much paint along the way.
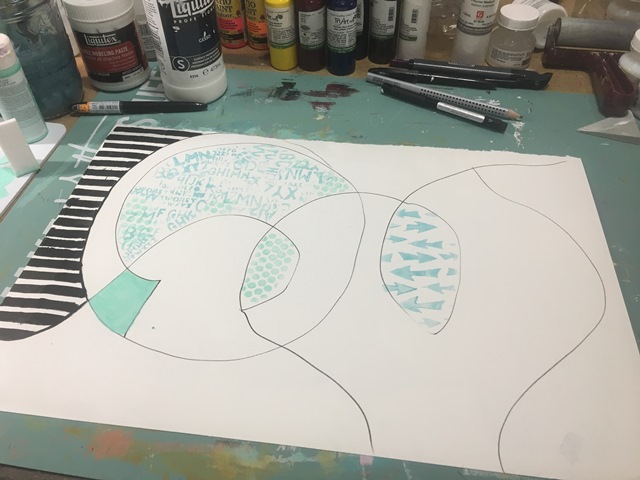

For this next step (TIP ALERT), I applied Collage Pauge only in the pattern shape on the right hand side (see above image).  Laid the vintage paper down on top, burnished it well.


Now using a round brush dipped in water, I followed the line and tore slowly along the wet edge. Voila - almost perfect.


I continued to pull out stencils and used the paints on my palette board, often mixing the colors or simply not clearing off my sponge.  Other stencils introduced here include Dyan Reaveley's Old School Numbers, Holes and Flower Pop.


For this next step, I stenciled onto Deli Paper using the BoozyBear's Stencil Library, I once again followed the same technique of adhering the Collage Pauge to the area I wanted the Deli Paper to stick and then used a wet brush to 'tear' the sheet.


Now I simply started filling in the remaining opening with either more paper elements, straight up paint or more stencil (top center is Tim Holtz's Layering Stencil Ringer (THS056)


Now it was time to start creating layers and depth.  I simply pulled out a variety of stencils from my bin I thought would work best - some new to the page, others were repeats.  New ones included some Stencil Girl Product ones (Rae Missigman line) and Crafter's Workshop Blazonry and Repeating Pods.  You can also see I added more collage paper/elements in the form of punched papers, torn papers and Tissue/Washi Tape


Here is a larger shot of the final piece (so far).


As much as I love the blues, I must say I am really liking the black and pops of white (which is actually the gesso'd base)!

I enjoyed doing this so much, I tried another on, with a different approach of course!

Using a 'pink' base this time around, Martha Stewart's Multi-Surface Satin Paints in the following colors: Ballet Slipper, Camella Pink, Pink Dahlia and Party Streamer.


This time around I was going to try and stay on a 'floral' theme, so I started pulling as many floral stencils that I could.  First up was Joggles Sunflowers.


I used it twice with two different pinks.  As mentioned before, I moved and turned and flipped the stencil around - often layering or overlapping the images.


I apologize for the lack of photos for this next step - but as you can imagine - I was on a roll and there was no stopping me!  The stencils used were Joggles Leaf Specimens and Flower Blossoms, Prima's Flowers (#572150) and then of Donna Downey's Mini Number Repeat and the Dyan Reaveley Old School Numbers.  I used just about all the colors again with the addition of Black & White (the grey is by mixing the B&W).  


Once I was happy with my base, I simply added some partials from the Crafter's Workshop stencil Damask (TCW242) using black. 


You can see from these close ups that I once again only apply spottingly through the stencil and it is continually being moved around the page.


When I come across an area I feel is too bold I often will apply some white though one of the stencils already being used but will offset it so I am able to get some coverage and take that part of the page back. 


Really liked this one so much, decided not to add any collage pieces at this time.  But not to worry, this doesn't mean I still may not in the future!   That is one of the added bonuses of this style of work - it is done when you feel it is done....or often, when you have gone too far and no longer like it!


Right now....I like it!


Here is a full shot of the page as it stands now.


TIP: pages like these are great for taking photos of either along the way or at the end.  Using your images again (called leveraging your work), is a great way to keep using images/pages you like over and over again.  By taking photos or scanning your work and printing them off  then using them as collage fodder, image transfers, altering the image(s) in photoshop, creating layers....the ideas are endless! An important note when wanting to leverage your art work, if you print off - you need it to on a laser printer so it doesn't bleed.  If you use your inkjet printer it simply needs to be sprayed with a workable fixative.

Thanks for stopping by! 

Don't forget to keep an eye on my Instagram and Facebook accounts (and I'd love it if you would follow along) as I tend to post there more often (just not as much detail)!

Most products are linked to my online store W2 Scrapbooking & Mixed Media Art Studio and if I don't carry it, I will often link to where you can find it.

until next time...

Saturday, August 5, 2017

Faux Encaustic?

Well as usual my blog posts got the better of me and I once again neglected it. Seems to be the story of my life.  I am trying real hard to take time away from the shop to actually work on art, but life just seems to continually get in my way.

The rest of May & June were beyond busy in the shop and for that I thank you all for your continued support.  I also in my infinite wisdom finally caved and took on a teaching schedule at a local shop. I taught 4 classes during that time and am looking forward to starting up again in the fall.  Had a great group of ladies that had a ton of fun seeing into my world of crazy art creations.  Pretty sure I scared some and scarred others, hahaha!!

July was a total blur as we had about 10 days of actual holidays where we spent it with my family celebrating my Dad's 85th birthday.  We had 19 out of the 34 of us which is a pretty good turn out.  Ever since we lost Mom, we make a point of getting together as a family and celebrating any milestone possible.  Needless to say, this was an important one.  We came back from our holidays a few days early as we needed to help out Hubby's Mom.  She had knee replacement surgery this past fall and it has not been an easy go.  After taking her back and forth to the city a few time for Dr appointments and tests - it was determined to be a cracked knee cap.  She has no idea how it happened but  it has and now we need to wait a bit longer to see if it will heal on it's own.  Totally unsure how that works considering it is a knee replacement, not a real live bone...but what do I know, I'm not the Doctor.

So we've been back for a week now and I took full advantage of it an decided to delve into some Faux Encaustic work.  I took an hour or two each day and tried my hand at it.  I have been reading a lot of books lately on this and even though it may be basically the same process, how they all go about it is so different (frustrating).

The first one I found about it that I thought I would try my hand it was in a book called The New Acrylic - The Complete Guide to the New Generation of Acrylic Paints (Rheni Tauchid).  I was reading it while in one of the many waiting rooms over the past couple of weeks.  I came across the article on Acrylic Encaustic so thought I would give it a try once I was home.  So in Wendy fashion, I dove right in head first, only to get hung up pretty quick.  The article did not give near enough information which I figured out too late.  So if you follow me on Instagram (@w2scrpbk) or the shops Facebook page (@W2 Scrapbooking & Mixed Media Art Studio), you will have seen a good amount of this already.

Day One...

I am working on a 12x12" (Mdf topped) Cradle-board that I made myself.  I prepped the surface with two good coats of White Gesso.  Once the gesso was totally dried, I applied a mix of  Adirondack Acrylic Metallic Pearl and DecoArt Fluid Acrylic Interference Blue paint with a 1/2" Flat Wash Brush


Once it was dry, I applied a thick coat of  3D Gloss Gel with my metal palette knife.


No need to get it too smooth, just be sure you have the entire substrate covered. NOTE: be conscience of the amount of gel you use.  I used way too much and most of it went into the garbage as I did the squeegee step!


While it is still wet, apply a thin layer of diluted transparent paint - in this case I used Golden Fluid Acrylic Phthalo Blue (Red Shade). Reminder that Gels are white out of the container but do dry clear.


Now take a squeegee or large palette knife and smooth out the surface.


Now, using a mark making tool of some sort, etch in some focal points in the wet surface.  I used a small wooden dowel.


The great part here is if you are not happy with your markings, just go over them again with your trowel/knife/squeegee, which is what I did.  Only downfall is that it will continue to move the colors.  This is how it looked at the end of day one.  


It now needed to fully dry for at least 24 hours now.  It has been a very humid summer for us which is not normal by any means.  Surprisingly enough, I was able to find my patience and wait the 24 hours! Yay me!! 

Day Two...

This was where I was starting to get frustrated on the directions in the book and the direction the piece was taking.  So after applying the wash, I went totally off and decided to add some more texture, literally!

The photo below shows the application of a Phthlo Blue (Red Shade) wash over the dried piece.


The book did not really tell me what color of wash to use, I just thought it should be a dark one as it was quite 'white' still.  So once I wiped off some of the wash with a rag, I decided to add some texture in the form of found items in my stash.  I used rough cut pieces of rug gripper, drywall mesh, a mesh ribbon and some bits from circular plastic canvases.  All applied using the same 3D Gloss Gel.


Here are a few close ups so you can see the textures.


 I needed to do some more reading and research on the Internet (videos and such) for other artists who did this sort of thing now as I was not at all happy with the direction it was going.  Once again it needed 24 hours to dry as I was using the heavy gel.

In my Internet search, I came across an interesting site with a French artist who is let's just say, very inspiring!  Laly Mille has some of the most beautiful work I have seen in a while.  I found her (again) when I did a google search of 'Acrylic Encaustic' - I say again as low and behold I already follow her on Instagram! Go figure! The one that really stood out to me was this video I found on YouTube (her channel link here). It got my mind really swirling with ideas on how I could improve what I had started and how I could do future pieces.

Day Three...

I started out applying a new 'wash' - but in this case, I decided on doing a glaze.  I used Golden Acrylic Glazing Liquid (Satin) with Golden Fluid Acrylic Quinacridone Nickel Azo Gold.  I allowed it to set for about two minutes then I proceed to wipe it off with a baby wipe.


I let it sit for about three minutes (ya, lost my patience again) and poured over Golden Self Leveling Clear Gel and tried to tip and tilt the board to spread it out and gave up quickly and used a palette knife.


Now once again, this needed 24 hours to dry! UGH so not good at this part of arting!  NOTE: at this point, I should have tinted my gel and I think I would have been happier, but hey...there's always a next time!

I continued to do more reading on this and pulled out some of my books in my ever growing art book collections and came up with two more that I thought were helpful.  Rethinking Acrylic - Radical Solutions for Exploiting the World's Most Versatile Medium (Patti Brady) and Acrylic Painting for Encaustic Effects - 45 Was Free Techniques (Sandra Duran Wilson).  The Patti Brady one was my favorite - not necessarily for the information (there really wasn't a lot), but it is so loaded with more general information on understanding acrylics in general.  Patti is not only an accomplished artist, she is Golden Artist Colors Inc Working Artist Program Director and you will often see her in their videos.  Here is the link to here site.  Another artist I looked for info on this was Jodi Ohl.  She has a workshop called Fearless Faux Encaustic that I have had for a while and think I need to go back and look at again.  It has been a long time and I honestly can't remember much about it. 

Day Four...

If you can imagine, even after 24 hours this was not totally dry!  But I push on and scratched and scraped in some marks using a piercing tool, chopstick and a metal staple remover.


Hard to see here, but as I was pushing in using the chopstick, it actually kind of molded back into it's flattened state.  I was able to finally get a few ridges, but hardly noticeable.


I added some F+W Acrylic Ink in Sepia in the areas where I scratched and scraped.


really working in with the brush...


I then used a cotton rag and wiped it off so to leave the ink in the cracks and crevices. 


I again was not overly happy here, so i decided to  add some solid color in the form of a mixture of Golden Regular Gel (Matte), Liquitex Heavy Body Paint Titanium White and Prima Artisan Powder in French Sage.


I wiped and added until I was happy(ish). 


End of day, getting to like it again, even though I can pretty much say there is nothing Encaustic about this anymore.  But staying positive on it as I am learning a ton on what not to do and what I can do in future applications - in the wise words of Mr Tim Gunn, "Make it work!" That I am!!

Day Five...

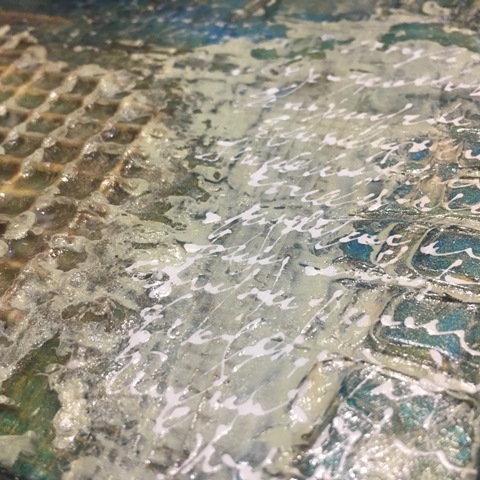
Here is what I was (am) hoping to be the last day of applications!  I took note from a part of Lay Mille's video and added some white scribbles using Golden High Flow Acrylic Titanium White paint in a Fineliner.


I also used some Golden Fluid Acrylic in Raw Umber in hopes of adding more emphasis on the scratches and areas of texture. 


The final application was to tone down the shininess of the piece.  For this I used a mix of Golden Soft Gel (Matte) and Golden Fluid Acrylic Iridescent Gold (Fine) and applied it with a brush first then tried to smooth it out with my Ranger Craft Squeegee. 


I did make sure the scribbles were totally dry before applying this final coat.  I used my Ranger Heat Tool and a little bit of my patience!


Here are a few close ups...


You can see already in the photos that the shininess is not as prominent and that makes me happy.  You know how I get with Shiny Objects...Squirrel!!


Here it is today, day six, fully dry and not near as shiny!  Am I happy with it? Not sure yet, not something I would normally do outside a journal.     


But will say I did learn a lot and will definitely try more like this.  I already have some cool ideas on how to do this on another substrate but not actually leaving the found objects in the piece.  I would like to do some using collage elements as well, I think that would be very interesting and possible not as time consuming!

If you lasted all the way through this very long post, thank you, hoping you enjoyed my trials and errors along the way and look forward to hearing your take on it too!

Until next time...hopefully not a long time...

That Other Neutral Triptych

  That Other Neutral Triptych wrapped canvases 10x10x1.5" (x3) professional grade artist materials I worked on this smaller series at ...