This is by no means anything new, just new to me. I was inspired by an image I had seen of MaryBeth Shaw of Stencil Girl Products (shared it way way back on my FB page) where she created a pattern using stencils with the pattern - clear as mud right? Ya...cause that is about how I remember it and how I decided to go with it and of course add my twist to it by using collage papers as well.
So come along with me as I try and steer you through my creative thought process.
I was o a monochromatic kick for this one and must say, quite enjoyed the process - not to mention the colors I decided on...Martha Stewart's Multi-Surface Satin Paints in the following colors: Lake Fog, Surf, Pool, Beetle Black & Beach Glass.

I picked out some Dyan Reaveley Stencils including Directions, Fresh Dots, Old School Alphabet, and Donna Downey's stencil Circles & Stripes (#DD-081). I was careful to keep the stencil images with the lines I had created on my sheet (12x18" Watercolor sheet). I used my Fudeball pen to freehand the pattern (note the prettiest, but it worked). I applied the paints using a makeup sponge wedge, being careful not to apply too much paint along the way.
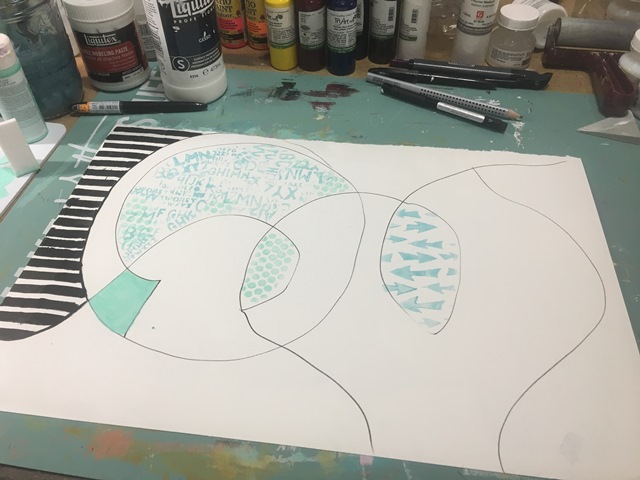
For this next step (TIP ALERT), I applied Collage Pauge only in the pattern shape on the right hand side (see above image). Laid the vintage paper down on top, burnished it well.

Now using a round brush dipped in water, I followed the line and tore slowly along the wet edge. Voila - almost perfect.

I continued to pull out stencils and used the paints on my palette board, often mixing the colors or simply not clearing off my sponge. Other stencils introduced here include Dyan Reaveley's Old School Numbers, Holes and Flower Pop.

For this next step, I stenciled onto Deli Paper using the BoozyBear's Stencil Library, I once again followed the same technique of adhering the Collage Pauge to the area I wanted the Deli Paper to stick and then used a wet brush to 'tear' the sheet.


Now I simply started filling in the remaining opening with either more paper elements, straight up paint or more stencil (top center is Tim Holtz's Layering Stencil Ringer (THS056)

Now it was time to start creating layers and depth. I simply pulled out a variety of stencils from my bin I thought would work best - some new to the page, others were repeats. New ones included some Stencil Girl Product ones (Rae Missigman line) and Crafter's Workshop Blazonry and Repeating Pods. You can also see I added more collage paper/elements in the form of punched papers, torn papers and Tissue/Washi Tape.


Here is a larger shot of the final piece (so far).

As much as I love the blues, I must say I am really liking the black and pops of white (which is actually the gesso'd base)!
I enjoyed doing this so much, I tried another on, with a different approach of course!
Using a 'pink' base this time around, Martha Stewart's Multi-Surface Satin Paints in the following colors: Ballet Slipper, Camella Pink, Pink Dahlia and Party Streamer.

This time around I was going to try and stay on a 'floral' theme, so I started pulling as many floral stencils that I could. First up was Joggles Sunflowers.


I used it twice with two different pinks. As mentioned before, I moved and turned and flipped the stencil around - often layering or overlapping the images.

I apologize for the lack of photos for this next step - but as you can imagine - I was on a roll and there was no stopping me! The stencils used were Joggles Leaf Specimens and Flower Blossoms, Prima's Flowers (#572150) and then of Donna Downey's Mini Number Repeat and the Dyan Reaveley Old School Numbers. I used just about all the colors again with the addition of Black & White (the grey is by mixing the B&W).

Once I was happy with my base, I simply added some partials from the Crafter's Workshop stencil Damask (TCW242) using black.

You can see from these close ups that I once again only apply spottingly through the stencil and it is continually being moved around the page.

When I come across an area I feel is too bold I often will apply some white though one of the stencils already being used but will offset it so I am able to get some coverage and take that part of the page back.

Really liked this one so much, decided not to add any collage pieces at this time. But not to worry, this doesn't mean I still may not in the future! That is one of the added bonuses of this style of work - it is done when you feel it is done....or often, when you have gone too far and no longer like it!

Right now....I like it!

Here is a full shot of the page as it stands now.

TIP: pages like these are great for taking photos of either along the way or at the end. Using your images again (called leveraging your work), is a great way to keep using images/pages you like over and over again. By taking photos or scanning your work and printing them off then using them as collage fodder, image transfers, altering the image(s) in photoshop, creating layers....the ideas are endless! An important note when wanting to leverage your art work, if you print off - you need it to on a laser printer so it doesn't bleed. If you use your inkjet printer it simply needs to be sprayed with a workable fixative.
Thanks for stopping by!
Don't forget to keep an eye on my Instagram and Facebook accounts (and I'd love it if you would follow along) as I tend to post there more often (just not as much detail)!
Most products are linked to my online store W2 Scrapbooking & Mixed Media Art Studio and if I don't carry it, I will often link to where you can find it.
until next time...


No comments:
Post a Comment