Showing posts with label Heidi Swapp. Show all posts

Sunday, April 5, 2015

More March 'MUM' Inspiration...

Butterfly Garden:

This next project was a fun one for me...I would say it is pretty much inspired by Marta of Maremi SmallArt.  This lady really gets my creativity juices going.

This paper is a cold press water color, I have used Light Modeling Paste with one of my new fave Prima Designer Stencil Daisies (6x6").


Once dired, I splatter Lindy's Stamp Gang Sprays (green, yellow & blue) and add water to disperse.


So love how they react.  The colors are truly magical.


Knowing the page needs more, I use the same sprays and ink up the 6x6" Filigree sheet from the kit.


Tear it up and adhere to the open spaces (top left corner and bottom right corner).


Inking up the four butterflies that are included in the kit, I spray and dab the same colors I used on the page.  Once dried, I attach each using Glossy Accents.


Once attached, I mold the butterfly wings up, it is like they are flying on the page.  I then add some of the pearls from the kit onto the filigree paper. 


Great page, even if I do say so myself!

Living Canvas:

Here I have used the Tim Holtz Eclectic Elements 6x6" Fabric, cut it up using a pair of pinking shears into random sizes and incorporated a few pieces of the Finnabair Elementals Canvas Resist that was still left.  This one was inspired by a video on You Tube (sorry, will have to go looking for it to give credit).  Hers was done with paper, mine...fabric - why not?!  I adhered it all down with Ranger/Claudine Hellmuth's Multi Medium.


Once it was totally dried, I applied Gesso using my brayer and palette knife.


Thinking I will try something different this time (well, okay not totally different, just a different product) going to try the Heidi Swapp Color Shine as water colors...wish me luck!


I find that if I give the page a good dose of water before applying color, I can usually get my desired effect. Usually you ask?  Stay tuned!


Not at all happy with the color results.  Having done this now, I am pretty sure that I know where I went wrong.  I did not apply enough gesso.  I should have put a thicker 'cover' over the fabric.  I may even try using Clear Gesso next time and then use some coordinating colors for the fabric.  What is the worse that can happen?!  So for now, let's see if I can salvage it....

Time for some more texture (layers).  Using one of my Prima Finnabair Elementals Stencil 'Netting' I add Light Modeling Paste with my palette knife.


Once dried, I amp up the color using Dylusions Ink Spray 'Postbox Red'


continue to use the Heidi Swapp Color Sprays and spritz with water to allow colors to spread/seep down the crevasses.


Well, that is it for today.  Hope you have enjoyed some inspiration using the March Kit.  April is built and I will start working on some new inspiration for you.  Have a wonderful new guest designer for April's Mix Ur Media Kit...be sure to check back by month's end!

Thursday, December 11, 2014

oops...and yes - I'm still inspired by!

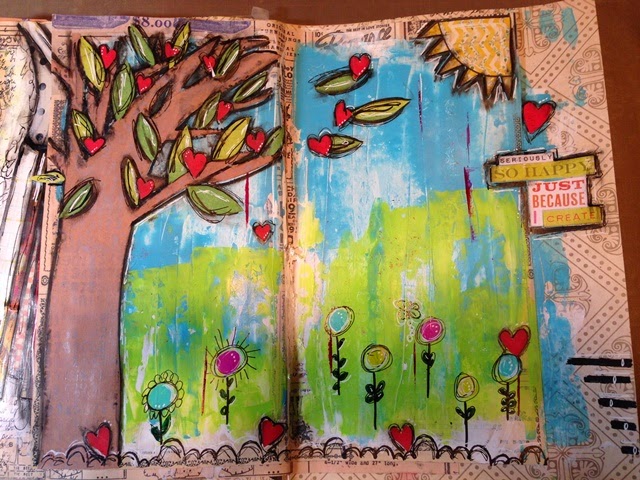
I have been so busy and yes, as usual I have once again neglected the blog!! So be prepared for some major picture and inspirations from yes, you guessed it - Christy Tomlinson!  I simply can't get enough of her and I am finding so much inspiration in her work right now!!  May have something to do with that it is simply something 'different'!  So in the last post, I teased you with what was my last page in the art journal I was working on while at Bittern Lake for a retreat.  Here is the final result!

I free hand cut some leaves and hearts to add to my tree!  Adhered them on with matte medium.


added some 'texture' to the trunk of the tree by simply stamping on it using Distress Picket Fence with one of my Kaisercraft Texture Stamps (Numbers).


I added a phrase using leftover pieces from my Heidi Swapp Favorite Things Paper Pad (the heart page) and of course outlined it all using my Faber Castell Black Brush Pen.


here in simply used my Liquitex Paint Marker along with my Uniball Signo White Pen to make a few marks.


here is the final result!


This next page is one that once again I took inspiration from Christy on (image is on my Pinterest Board here).

Started by applying gesso to the base then adding old book pages and adhered with matte medium.  

I want to make a note here about matte mediums.  Please note that not all matte mediums are created equally.  I have mainly used Golden Matte Medium in the past and have been very happy with it, but for some reason thought I would try a Liquitex one - let's just say it adheres great, but I cannot get the same response to my Faber Castell Brush Pens on it as I can with the Golden.  So what did I learn - the obvious. Golden for me is really the go to matte medium as I simply can do it all with it versus the other brand.  Mind you, have have yet to try it using the Ranger brands, that will be for another time (I'll let you know).


now I applied Dina Wakley's Media Heavy Body Paint in White over the entire page(s).


then proceeded to wipe it off after a minute of letting it 'dry' so I was able to get a white wash look.  Having done that, I think that next time I may very well use a smaller amount of the paint and simply add water mix and apply with brush!


dry to set.


now it is time for some color!  Once again it is Dina Wakley Media Paint - Sky.  Applied with my handy and go to tool...my starbucks gift card!


once it was dried partially, I did wipe some off with a baby wipe (sorry no photo).

now it is time for some fun.  I used the Tim Holtz Alterations Decorative Strip Butterflies to 'cut' away part of the dress and then of course make more butterflies. 


adhered them all down with my matte medium.


now I decided to finger paint with the following blended colors...


the paper I should mention, is once again Heidi Swapp's Favorite Things. Before I painted I did some doodling as you can see (the cloths line and the hill for the green to be applied).


here is a close up of the brush pen and how it reacts to the Liquitex matte medium.  I definitley do not get the same blending I do with Golden, it almost comes right off.  But if I go between the small brush and the fat brush, I get the results I am more used to.


of course a page is never finished lately unless I use my Uniball Signo pens - in this case Black and White.


A couple weekends ago I thought I might try something a bit different - I had finally gotten my copy of Dina Wakley's Art Journal Courage so wanted to try one of her 'prompts' (page 32 I believe).

here we go....
I pulled out some stencils and paints and as my base, I thought I would pull out of my paper stash a time card!

applied gesso...


first coat of paint is Lime...


wiped off access using a baby wipe through a stencil...


the results....


applied a second layer (turquoise) and did the same process...


here is the result... 


I ended up moving the stencil and rubbed a bit harder, like how this one turned out!


used my next layer and stencil but this time used Dylusions White Linen spray.


these next two photos are the second card where I used all the 'leftovers' from the stencils and craft mat.


I doodled using my Stabilo Black Pencil then added white paint to enhance what I was trying to make (leaves).


once dried, I literally scribbled with my black signo around the leaves and then used my Faber Castell Big Black Brush for the stem.


then the fine brush for the leaves as I wasn't happy with how clean it looked. 


I am able to get a good smudge with wetting my finger either with water or tapping my finger on a baby wipe.


time for more doodling - Dina said write something to inspire you...


wanted more color, so used my Red Big Brush Pen on each leaf.


Added more interest with circles....


time to add some more fun on the 'leftover' page!  I used yet another stencil - think it is a Prima one by Finnabair Checker I believe. I sketched out the vine once again using my Stabilo pencil


The girls over at the Pink Camera challenged me to add: neon, pink, black, sparkles, circles, background stamp and reflections.  So I killed two birds with one stone by using Tim Holtz's Reflections Background Stamp! I applied the pink neon paint to the stamp and then stamped the page.


adding of paper in the leaves was an idea of Dina's to create different texture as compared to the last one that was strictly paint.


'sparkle' was using Splash of Color's Twinkling H2O's, hot cinnamon is the color.


while it was still damp, I used a circle stencil to wipe away some of the Twinkling H2O


now it is time for black!


nailed it!!

here are couple more shots of the final pages...


thanks for popping by...I have a couple more to post this weekend with a great idea I had for my version of 'December Daily'.  See you soon, in the mean time...stay creative!!

Most products used here can be purchased at W2 Scrapbooking! Lots of posts over at Facebook and on Instagram (@bwdward) so come follow along!


That Other Neutral Triptych

  That Other Neutral Triptych wrapped canvases 10x10x1.5" (x3) professional grade artist materials I worked on this smaller series at ...