Head over there now to see what's left!
Showing posts with label Simple Stories. Show all posts
Showing posts with label Simple Stories. Show all posts
Sunday, April 21, 2013
New SALE items added!
Just added all the Simple Stories (2012 releases and earlier) to the sale section - all marked down 20%

Wednesday, January 2, 2013
Simple Stories
** UPDATED **


Wednesday, November 28, 2012
Advent Inspired!
After looking at all the Advent ideas out there, I did what any 'sane' scrapper would do - make one!
I started on mine on Monday night, loved how it was turning out, but was not happy that it really wasn't Christmas enough for me!
The base of the project came from a class I bought via Stephanie Ackerman's Homegrown Hospitality Blog called Homemade Holidays 2012. The Canvas itself is pretty cool I must say, but started to lose the effect when I added the clips. So what does one do....


....she heads off on another tangent! Must say, liking this tangent! Really, it took me about 30 minutes start to finish.


Products used (25 Days of Christmas): Prima 4x6" Canvas Refill Page, Seam Binding Tape sprayed with Ranger Adirondack Color Wash Meadow, Poinsettia made with Tim Holtz Sizzix Bigz Die Tattered Poinsettia, covered with Distress Stickles Rock Candy with some glitter mixed in; inked with Tim Holtz Distress Ink Pad Gathered Twigs.
Canvas covered with 7 Gypsies Collage Tissue Paper Paris, adhered and sealed with Ranger Glue n' Seal Matte, bits and pieces of paper from the Simple Stories 25 Days of Christmas 6x6" Paper Pad. I used a little bit of this and that when I came to create the background on the canvas - Tim Holtz Distress Stain Tarnished Brass, Ranger Adirondack Acrylic Paint Dabbers in Bottle and Cranberry, Adirondack Color Wash Spray in Meadow, Studio Calico Mister Huey's Color Mist in Classic Tan as well as some Tattered Angels Glimmer Mist in Meadow Green.
Prima Junkyard Findings Typo Bulb 1 adhered with Ranger Glossy Accents; clips are from my stash of office supplies I am trying to use up, but you could use Tim Holtz Hinge Clips too! I used Tim Holtz Washers and Long Fasteners to attach to the base. The 'tags' are actual pages from the Simple Stories 25 Days of Christmas paper that I simply cut to size and inked the edges. I also dded Tim Holtz Alpha Parts - Ransom numbers to each tag.
There are a total of 12 tags - one each of the numbers 3-9 and 0, two each of the number 1 & 2. Thought about making a 13th tag with an additional 0, but then just said what the heck do I need a 0 0 for on Christmas Day!
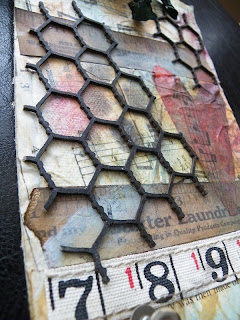
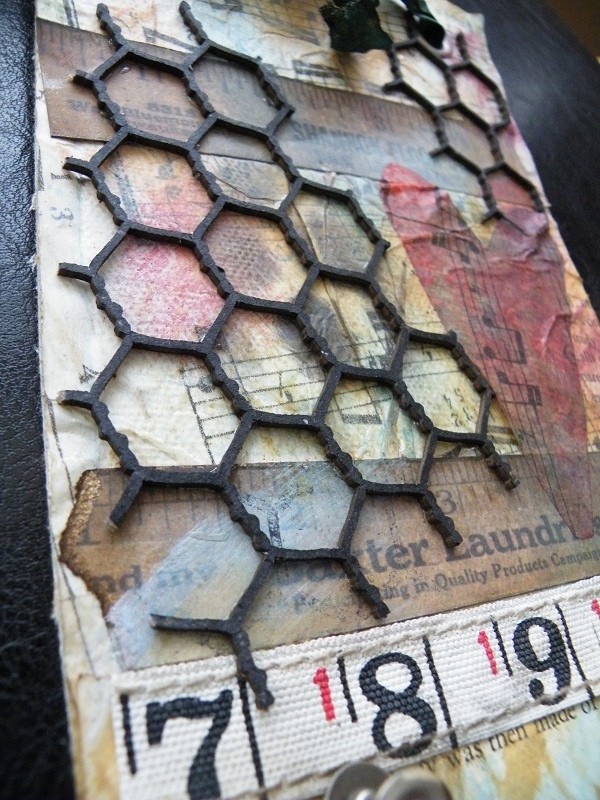
The 'first attempt' products used: Prima 4x6" Canvas Refill Page, Seam Binding Tape sprayed with Ranger Adirondack Color Wash Meadow. Canvas is once again covered with 7 Gypsies Collage Tissue Paper Paris as well as some bits and pieces of paper from Tim Holtz Paper Stash Crowded Attic. Inked with more or less the same as the second but did add some Gesso. Embellished with Tim Holtz Ruler Ribbon and some ScrapFX Chicken Wire Chipboard (inked with Ranger Jet Black Archival ink) from my stash. Chicken Wire was adhered to base using Glossy Accents. Clips were done the same and this time I used Tim Holtz Journaling Tickets as the countdown source. Just hadn't put any number on yet when I took the photos.
I started on mine on Monday night, loved how it was turning out, but was not happy that it really wasn't Christmas enough for me!
The base of the project came from a class I bought via Stephanie Ackerman's Homegrown Hospitality Blog called Homemade Holidays 2012. The Canvas itself is pretty cool I must say, but started to lose the effect when I added the clips. So what does one do....


....she heads off on another tangent! Must say, liking this tangent! Really, it took me about 30 minutes start to finish.

Here are a few close ups of the completed project.


made the poinsettia 3D by pinching the leaves with my index, middle finger and thumb to curl it and give it some lift.


Canvas covered with 7 Gypsies Collage Tissue Paper Paris, adhered and sealed with Ranger Glue n' Seal Matte, bits and pieces of paper from the Simple Stories 25 Days of Christmas 6x6" Paper Pad. I used a little bit of this and that when I came to create the background on the canvas - Tim Holtz Distress Stain Tarnished Brass, Ranger Adirondack Acrylic Paint Dabbers in Bottle and Cranberry, Adirondack Color Wash Spray in Meadow, Studio Calico Mister Huey's Color Mist in Classic Tan as well as some Tattered Angels Glimmer Mist in Meadow Green.
Prima Junkyard Findings Typo Bulb 1 adhered with Ranger Glossy Accents; clips are from my stash of office supplies I am trying to use up, but you could use Tim Holtz Hinge Clips too! I used Tim Holtz Washers and Long Fasteners to attach to the base. The 'tags' are actual pages from the Simple Stories 25 Days of Christmas paper that I simply cut to size and inked the edges. I also dded Tim Holtz Alpha Parts - Ransom numbers to each tag.
There are a total of 12 tags - one each of the numbers 3-9 and 0, two each of the number 1 & 2. Thought about making a 13th tag with an additional 0, but then just said what the heck do I need a 0 0 for on Christmas Day!
The 'first attempt' products used: Prima 4x6" Canvas Refill Page, Seam Binding Tape sprayed with Ranger Adirondack Color Wash Meadow. Canvas is once again covered with 7 Gypsies Collage Tissue Paper Paris as well as some bits and pieces of paper from Tim Holtz Paper Stash Crowded Attic. Inked with more or less the same as the second but did add some Gesso. Embellished with Tim Holtz Ruler Ribbon and some ScrapFX Chicken Wire Chipboard (inked with Ranger Jet Black Archival ink) from my stash. Chicken Wire was adhered to base using Glossy Accents. Clips were done the same and this time I used Tim Holtz Journaling Tickets as the countdown source. Just hadn't put any number on yet when I took the photos.
Let the countdown begin!
Thursday, November 15, 2012
'Simple' Heidi...
Here is a fun project I made using the inspiration of Heidi Swapp's Memory Files and some of my paper stash by Simple Stories.


I had a lot of fun making this album, but it did take a LONG time to do! I started with one pack of Heidi Swapp Chipboard Memory Files (four files in two different sizes) and about 24 sheets of the Simple Stories Destinations 12x12" papers (these were some of the older stock and stash of mine and just wanted to use up). The cool thing about making this album is you could use ANY and I do mean ANY 12x12 paper pack(s) you desire!
Below I used one 12x12" sheet and cut it in half and then scored at different lengths (one at 4" and one at 6") to create my own 'fotostack'! Punched the edges with one of my favorite punches...Bubbles!

Throughout the pages you will see (well, it is hard to see, but I really did) 'fussy cut' many of the printed items on the pages out and layered them on the pages. If you are familiar with these papers, you will be able to see a lot easier.

This one is a 9 5/8 x 5 7/8" Booklet Envelope that I covered with the papers and then made a flag banner. Of course added an eyelet and some Seam Binding Ribbon stained with Tim Holtz Distress Stain Peeled Paint. You can now use the envelope to put memorabilia from your trip in it, create another mini to put inside, use as hidden journaling...the possibilities are endless!

The circle strip was made using the Tim Holtz Alteration Decorative Strip - Washer Border.

Layers of paper and a strip of Heidi Swapp's No Limits Information Trimmings, inked and crumpled up!

Now I used a 5 7/8 x 9 5/8" catalogue envelope, once again covered it up with some of the paper(s).

Added one of the 4x6" Journaling Tags that I cut out from the 12x12" sheet.
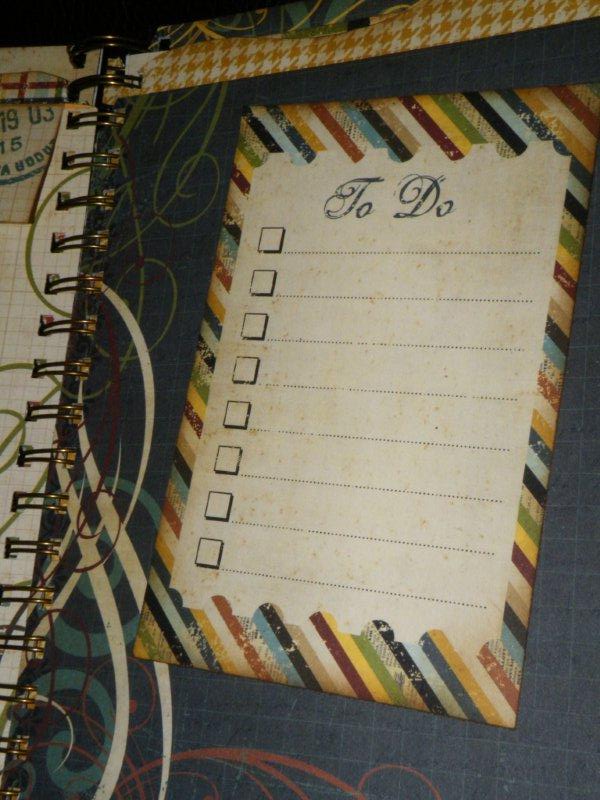
Created a side 'pocket' by gluing only three sides of the strip (punched along the edge with yet another of my favorite punches) and once again tucked in a 4x6" Journaling Card that was cut from the 12x12" sheet.

Here is one of Heidi's Fotostacks, this one is Version 2.

More cutting out of elements from various papers that create my own decorative border(s).


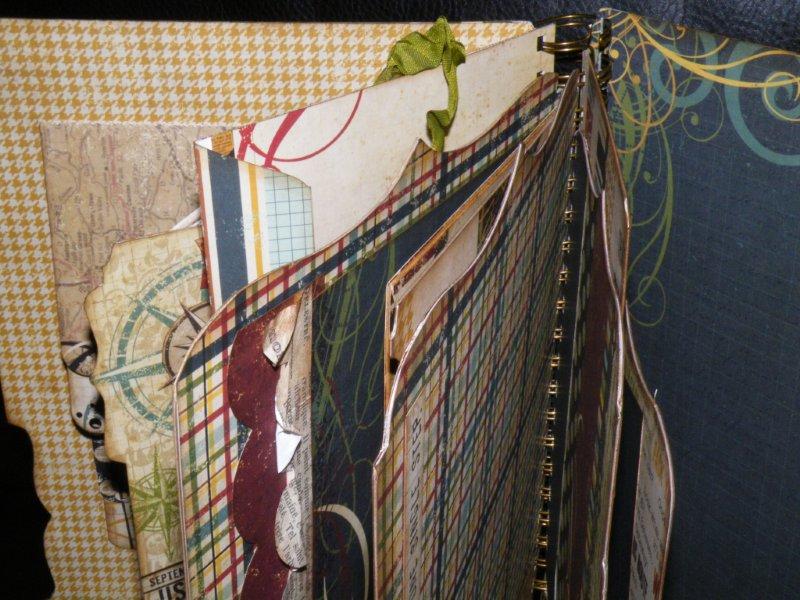
Below, I used a 5x8" Card Guide (1/3 tab) to create yet another 'page' in the album.

Below is a 3 3/8 x 6" (#6) Coin Envelope, covered and turned sideways to include in the binding.

More cutting of page elements, this time 3x4" tags along with a few more images that were cut out to create a decorative border.

Here is a close up of the fringe that I purposely destroyed from Heidi's No Limits Information Trimmings! I say this in a class I took from her. If you heat it up 'gently' with your heat tool, and crinkle it with your fingers, you get a pretty cool effect! Loads of texture.

Here is a close up of the Bubbles border punch. Love the shadows it gives off.

Finally, here are a couple shot of the album sitting upright in all it's glory.

All edges are inked with Tim Holtz Distress Ink Pad - Gathered Twig. I used the Zutter 3/4" Antique Brass O-Wire to bind it and of course used my Bind-It-All.
For more inspirations on Memory File projects, be sure to check out Heidi's website here!
Tuesday, November 13, 2012
just to tease you...
....until I have some more time to actually post everything!
Here are some of the projects I worked on when I was at Bittern Lake Lodge last weekend with the Bittern Lake B!tches....


stay tuned...more photos and details will follow shortly!
Here are some of the projects I worked on when I was at Bittern Lake Lodge last weekend with the Bittern Lake B!tches....
7G Calendar

K & Company SMASH Book, from start to finish (well almost)!

Heidi Swapp Memory File Album (with Simple Stories Destinations Papers)

Heidi Swapp Magnetic Book with Tim Holtz Kraft Resist

stay tuned...more photos and details will follow shortly!
Subscribe to:
Posts (Atom)
That Other Neutral Triptych
That Other Neutral Triptych wrapped canvases 10x10x1.5" (x3) professional grade artist materials I worked on this smaller series at ...

-
 Here is the next project I worked on - this is from waaaaay back in October! I started it at the last Tomahawk retreat. It is once again ...
 -
That Other Neutral Triptych wrapped canvases 10x10x1.5" (x3) professional grade artist materials I worked on this smaller series at ...
-
"Swept Away" 18x24x1.5" wrapped canvas professional grade artist materials - acrylics This is a piece from April that came to...

