Friday, December 12, 2014

December Daily?

I decided this year NOT to do a December Daily....okay, let me back track a bit here!  It is not like I actually ever 'completed' a December Daily - I start with creating a base of some kind then get bored or overwhelmed with what is going on in December and it gets moved to the 'one day I'll finish you' basket! Don't try and tell me you don't have one of those too!!

So this year, I decided I would do a December Journal.  I have created a paper journal using 12x12" Paper from My Mind's Eye (Sleigh Bells Ring), and made enough pages to do '12 days' of Winter/Christmas/Seasonal images all done using strictly the Sleigh Bells Ring Collection (12x12" Paper, 6x6" Paper Pad, Washi Tape, Ephemera Die Cuts, Decorative Tags, etc) and the usual art journal mediums (paint, gesso, matte medium, etc). Oh, and let's not forget, the entire journal will be inspired by the talented Christy Tomlinson.  All the inspirational images will be from my Pinterest board found here.

Let's get started!

here is what I am using...


I built my jouranl using the 12x12" papers; scored at 8.5" and that is where I overlaped to create the fold/seam.


here is the front - it measures 8.5 x 12"


this is all I had left from the paper pack once I finished building the journal...


I measured out the center of the page and then spaced out every two inches up and down from there so I had a total of 5 holes.  I wanted to use the five hole binding technique on this journal as it is simple and of course easy to do!


page one...here we go!  


weird I know, but I covered it up with gesso!


one it was dry, I added some heavy body paint by liquitex...


I used my starbucks gift card to spread out the paint...


after I added more colors, I found it too bright for me, so I painted over the entire spread with white gesso (sorry for the lack of photos, but that is what happens when things are sometimes not going the way you like). 


see, better already!


now it is time for some mark making.  I simply used a paper towel tube and dug it into the paint (as it was quite thick) and then my starbucks card to create lines and swooshes!


this is the right hand side of the page, I wanted it a bit more dramatic, so did some dripping with some neon high flow paints by golden.


here is a photo of my color palette and brands...


since I was going to be building a large snowman, decided to just put a good size squirt on the matte medium right on the page.


now it was time to build my snowman!  I simply cut random widths and lengths from my 6x6" paper pad  to build him up.


see, I built a snowman!


I opened up my emphemera die cut pack to see what I could use - found the antlers and thought they would make perfect arms (simply cut them in half).


instead of a carrot nose, saw this mustache and thought PERFECT! Every snowman deserves a mustache!


next was the addition of the red cardinal die cut...


added some light modeling paste for the 'snow' at his base.


totally forgot every snowman has to have a scarf too! using my scraps, I added them on!
 

now it is time for some outlining using my Faber Castell Black Brush Pens (Reg and Big Brush) as well as a few roughly/random stamps along the way. Sorry, forgot to mention I added some Dina Wakley paints over the paper to mute it and give it yet another layer of interest.


I also added some white using my Uniball White Signo Pen...


here is a shot that shows where I 'scribbled' using my Uniball Signo Black Pen (that thing writes on anything)! 


now it is time to start working on the right hand side of the page - I am going to build a snowflake this time!


just cut up pieces from the 6x6" pad again and tried to make a snowflake, not my best piece of work, but isn't there something about not all snowflakes are created equally? then I added the wooden 'enamel' (but actually they are wood) dots.


time to use the big brush pen and trace around the outside of the snowflake.  once that was done, I tapped my finger on a baby wipe and rubbed away to get the effect I was after...


again, I 'scribbled' using my Uniball Signo White and Black pens...


the finished result - day one of twelve completed!


see you back soon with another page (only 11 more to go in 20 days)! eek...

Most products shown here can be purchased at W2 Scrapbooking.  Be sure to head over to my Facebook page and Instagram too (@bwdward) for more inspiration.

Thursday, December 11, 2014

oops...and yes - I'm still inspired by!

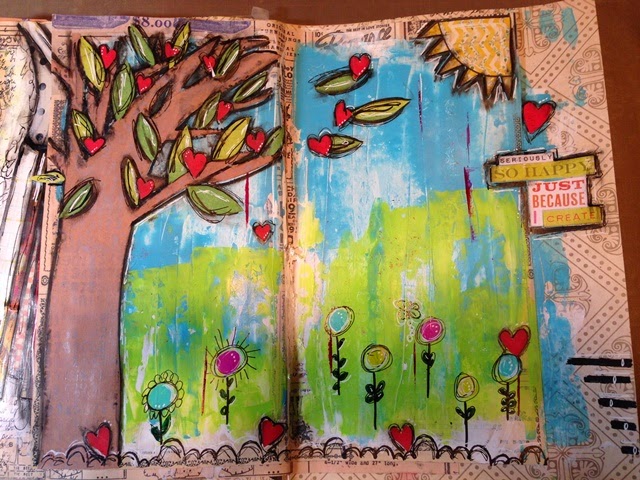
I have been so busy and yes, as usual I have once again neglected the blog!! So be prepared for some major picture and inspirations from yes, you guessed it - Christy Tomlinson!  I simply can't get enough of her and I am finding so much inspiration in her work right now!!  May have something to do with that it is simply something 'different'!  So in the last post, I teased you with what was my last page in the art journal I was working on while at Bittern Lake for a retreat.  Here is the final result!

I free hand cut some leaves and hearts to add to my tree!  Adhered them on with matte medium.


added some 'texture' to the trunk of the tree by simply stamping on it using Distress Picket Fence with one of my Kaisercraft Texture Stamps (Numbers).


I added a phrase using leftover pieces from my Heidi Swapp Favorite Things Paper Pad (the heart page) and of course outlined it all using my Faber Castell Black Brush Pen.


here in simply used my Liquitex Paint Marker along with my Uniball Signo White Pen to make a few marks.


here is the final result!


This next page is one that once again I took inspiration from Christy on (image is on my Pinterest Board here).

Started by applying gesso to the base then adding old book pages and adhered with matte medium.  

I want to make a note here about matte mediums.  Please note that not all matte mediums are created equally.  I have mainly used Golden Matte Medium in the past and have been very happy with it, but for some reason thought I would try a Liquitex one - let's just say it adheres great, but I cannot get the same response to my Faber Castell Brush Pens on it as I can with the Golden.  So what did I learn - the obvious. Golden for me is really the go to matte medium as I simply can do it all with it versus the other brand.  Mind you, have have yet to try it using the Ranger brands, that will be for another time (I'll let you know).


now I applied Dina Wakley's Media Heavy Body Paint in White over the entire page(s).


then proceeded to wipe it off after a minute of letting it 'dry' so I was able to get a white wash look.  Having done that, I think that next time I may very well use a smaller amount of the paint and simply add water mix and apply with brush!


dry to set.


now it is time for some color!  Once again it is Dina Wakley Media Paint - Sky.  Applied with my handy and go to tool...my starbucks gift card!


once it was dried partially, I did wipe some off with a baby wipe (sorry no photo).

now it is time for some fun.  I used the Tim Holtz Alterations Decorative Strip Butterflies to 'cut' away part of the dress and then of course make more butterflies. 


adhered them all down with my matte medium.


now I decided to finger paint with the following blended colors...


the paper I should mention, is once again Heidi Swapp's Favorite Things. Before I painted I did some doodling as you can see (the cloths line and the hill for the green to be applied).


here is a close up of the brush pen and how it reacts to the Liquitex matte medium.  I definitley do not get the same blending I do with Golden, it almost comes right off.  But if I go between the small brush and the fat brush, I get the results I am more used to.


of course a page is never finished lately unless I use my Uniball Signo pens - in this case Black and White.


A couple weekends ago I thought I might try something a bit different - I had finally gotten my copy of Dina Wakley's Art Journal Courage so wanted to try one of her 'prompts' (page 32 I believe).

here we go....
I pulled out some stencils and paints and as my base, I thought I would pull out of my paper stash a time card!


applied gesso...


first coat of paint is Lime...


wiped off access using a baby wipe through a stencil...


the results....


applied a second layer (turquoise) and did the same process...


here is the result... 


I ended up moving the stencil and rubbed a bit harder, like how this one turned out!


used my next layer and stencil but this time used Dylusions White Linen spray.


these next two photos are the second card where I used all the 'leftovers' from the stencils and craft mat.


I doodled using my Stabilo Black Pencil then added white paint to enhance what I was trying to make (leaves).


once dried, I literally scribbled with my black signo around the leaves and then used my Faber Castell Big Black Brush for the stem.


then the fine brush for the leaves as I wasn't happy with how clean it looked. 


I am able to get a good smudge with wetting my finger either with water or tapping my finger on a baby wipe.


time for more doodling - Dina said write something to inspire you...


wanted more color, so used my Red Big Brush Pen on each leaf.


Added more interest with circles....


time to add some more fun on the 'leftover' page!  I used yet another stencil - think it is a Prima one by Finnabair Checker I believe. I sketched out the vine once again using my Stabilo pencil


The girls over at the Pink Camera challenged me to add: neon, pink, black, sparkles, circles, background stamp and reflections.  So I killed two birds with one stone by using Tim Holtz's Reflections Background Stamp! I applied the pink neon paint to the stamp and then stamped the page.


adding of paper in the leaves was an idea of Dina's to create different texture as compared to the last one that was strictly paint.


'sparkle' was using Splash of Color's Twinkling H2O's, hot cinnamon is the color.


while it was still damp, I used a circle stencil to wipe away some of the Twinkling H2O


now it is time for black!


nailed it!!

here are couple more shots of the final pages...


thanks for popping by...I have a couple more to post this weekend with a great idea I had for my version of 'December Daily'.  See you soon, in the mean time...stay creative!!

Most products used here can be purchased at W2 Scrapbooking! Lots of posts over at Facebook and on Instagram (@bwdward) so come follow along!


That Other Neutral Triptych

  That Other Neutral Triptych wrapped canvases 10x10x1.5" (x3) professional grade artist materials I worked on this smaller series at ...