Friday, June 24, 2016

Weekend Junket #13


#w2wj13

technique - masking
tool - stencil
curveball - add stickers! 


hoping these prompts will urge you out of your comfort zone. Don't be afraid to think outside and beyond your tools and products.  Challenge yourself - you will be surprised and happy with the results.


Inspiration is everywhere, enjoy your journey....

**more details on these challenges can be found on the Weekend Junket tab above**

Sorry no inspiration from me today - I have been down and out with a nasty chest infection and have done nothing for over a week.  I do have an idea on this one and hoping I can get something to paper this afternoon (after my nap)!

Friday, June 17, 2016

21 Secrets - Tools & Techniques

I am taking part on an online workshop put on by Dirty Footprints Studio trying to challenge myself with doing different techniques.  Some have challenged me and others I just can't seem to get into (yet).  That is the great thing with with (most) online workshops - they offer lifetime access.  Now understand lifetime access means lifetime of the site!  If they shut down the site/business you too lose out on the information - unless, they offer downloadable content. Now having said that, you need to have the space available to do it too.  I have external hard drives for my online courses for that reason.  Makes life so much easier.  Then I can simply go through it as I wish when I wish.

I also like it when they have downloadable PDF's.  As I don't know about you, but I am continually making notes on classes and it is a great help if there is content to relate back too.  I have several presentation binders that I have printed of the course material and info and they are my go to when I am researching info or simply inspiration.  One day I will do a post on that, but for now - let's get to the the class I did recently that was part of the 21 Secrets Tools & Techniques.

Note: as this is a paid for class, I will not go into too much detail as that would be very disrespectful to Dirty Footprints and the instructor.

This class was taught by France Papillon and called Tango with Tengucho.  If you have been part of the scrapbooking/mixed media/art journal world for any length of time, you should have heard of France - she is one talented lady and is oozing with inspiration. She is in Belgium.  The first time I came upon her talent was via the Mixed Media Place and Art from the Heart blogs many many years ago.

Any hoo, be sure to search her out - she will no doubt inspire you as well.

The product she was showcasing was called Tengucho.  Now I don't now about you, but I had to go on a few hours internet search for find out what exactly with even was.  From what I have found (aside that I can't find it here in Canada), was that it is a man made.


Tengucho Paper
For centuries, handmade Tengucho (or Tengujo) was made in Japan out of Kozo fiber and known for its transparency & flexibility in uses. Machine made Tengucho paper have now replaced most Tengucho production, and is especially sought for conservation & repair, collage, and more. 
via Hiromi Paper Inc.

After several hours of searching and trying to see if there was anything 'similar' out there to it, I decided that dry sheets were the closest I could come up with or maybe interfacing.  Is it the same? I simply have no idea, but they look the same! So hey, why not try it out!!  I had found a post on a lady using dryer sheets for something else I thought what was the worst that could happen?  Knowing that I have allergies (and scents being a large one), I washed them again after they had been used.  Yes, even though they are already unscented ones!

I will showcase the two pages I did using this product, but there are many more uses for this product.

I chose to use color my sheets using Lindy's Stamp Gang's Flat Fabios Neon Graffitti.  I sprayed my non stick craft mat with three colors and then then spritzed with water and dropped the sheets onto the mat and mushed away.  I let them dry fully before adhering to my journal.  I did not prep my journal (I used my Canson Spiral Bound Mixed Media Journal) in any way as it was simply going to get adhered down with Matte Medium.  I only did one sheet (9x12).  One thing that I thought was interesting was how the colors really popped once the matte medium was applied and stayed even after it dried.  The texture is very cool.  I went an extra step and put a stencil over top and laid out some Super Heavy Gesso through it. Loved it!


I came up with a very cool idea (or so I thought) as I was laying it down onto the paper.  Wonder what kind of texture I could get it if I was to start with a textured page first!  So I pulled out my homemade 6x12" journal and used Light Modeling Paste through a Dyan Reavely Dylusions Stencil called Flower Medley.  I laid it on both sides as I wanted to try it two different ways. 


Once fully dry, I spritzed it heavily with water then dripped on some of my Daler Rowney Acrylic Inks (Paynes Grey and Flame Orange.


These needed to dry fully before I could go onto next step.  I first wanted to adhere down untreated (colored) over top of this side that was already colored.  Then I wanted to put a colored sheet over top of the plain modeling paste page and simply see what the difference would be. 


I used the same color combo on the sheet to be applied to the opposite page.


I should have had my first clue with how the colors turned out on the sheet.  Very dark and muddy!  I decided to cut up the sheet and adhere it down that way hoping it would show even more texture.


Ya, not so much! No matter how close I get with the camera, you still can't see the 'texture' underneath.  Thinking that I if had stuck to the lighter colors I had used before, I might have had better success.


So not wanting to ruin another page, I decided to simply put a deli sheet down over the pre-color page.  Better, but still not happy with it.  


Really not sure what to do here, so for now...
Lived it , didn't love it, learned from it, moving on from it.

Remember, this was totally my idea, nothing to do with the class!  I find that many classes allow me to expand on their thought and therefore inspire me...sometimes it works, sometimes not so much!

Have a great weekend!

Thursday, June 16, 2016

Inspired by....

Jenn Shurkus!  I saw this image on Pinterest and went on to create my own version.  Yes is it quite similar, but just enough different that I know I did it.

Jenn took a class with Dina Wakley and posted it on her blog and low and behold the image made it to Pinterest and my feed, and that is where I saw it.  So wanting to make sure I give credit where due - I searched her name and found her blog and blog post about the class.  You can read all about it here.


I pre gesso'd my page and picked out the two colors that I thought she had used - Magenta and Lemon.  I swiped them on using a very saturated brush.  I wanted the colors to blend and drip as much as they could.  Being that I was working the Dylusions journal (verses Jenn having torn out a page), I carried it over the entire two page spread.


Once I (somewhat) dried the base, I added a tron sheet o vintage music paper and adhered with matte medium.


I then added another layer using a piece of a shopping bag (brown paper) again adhering down with matte medium.


I used one of my pouncers dipped in black gesso.  I also took the Dina Wakley Affirmation Stencil and  pounced a few of the words vertically on the page.


Before it dried, I spritzed it with water for some dripage.


repeated on opposite page.


I then pulled out my Dina Wakley Media Stamp Set Woodcuts, and stamped two images with Archival Ink (Jet Black) onto white cardstock.  I then cut them out being sure to leave some of the white around the edges.


I then adhered them down using Regular Gel Medium as these were on a pretty heavy cardstock.


You can now see I added the music sheet and brown paper bag pieces to the opposite page now too.


I took a smaller brush and dabbed it in Lime for the leaf and a mix of Lime & Sky for the flower


I now pulled out my Dina Wakley Heavy Body Paint in Black that has a Fine Tip Applicator on it and traced around parts of the page I wanted to accent.  I then spritzed with water as I wanted bleeding/dripping.


I also scribbled along the colored paint drips.  I have had better success than this; however, paint tube is running very low.


Thinking it needed some white, I scribble with my Fineliner (filled with white) and added some accents around the circles.


Again, had a boat load of fun on this one and it really didn't take long...under 45 minutes! Don't you wish you could say that about all your pages?!

Thanks for stopping by...see you again soon!

Wednesday, June 15, 2016

I was inspired by...

Dina Wakley!  Who wouldn't be!!  I took inspiration from a Dina Wakley inspired stamp...yes a stamp!!  I also wanted to use all blue, okay - as much blue as I could, of Dina's Heavy Body Paints.  So I pulled out four from her palette of colors - Lapis, Sky, Turquoise and 
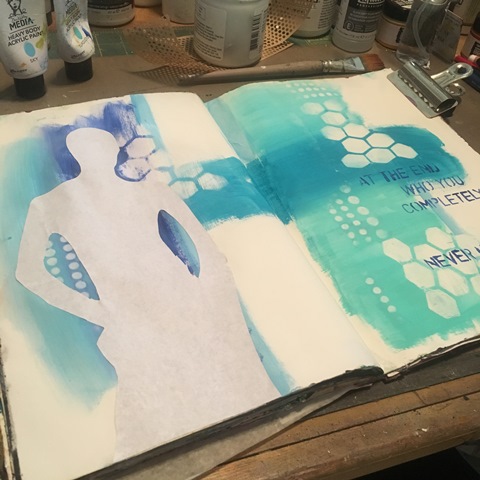
Ocean and dry brushed them on in a 'dina like' way.

I pulled out Dina Wakley Media Stencils (Essentials) and rubbed off some of the paint using baby wipes.  Then I took some of the Lapis paint and using one of my pouncers, dabbed it through another Dina stencil (Affirmation), being sure to only pick up a few of the words.


Now I got this image off of Pinterest, from one of Dina's boards (her stamps I believe).  It is a smaller stamp from what I can see, but since I am working in a large 9x12 journal, I needed it larger.  I simply copied the image and pasted it to a word doc and made it a large as I needed.  I knew I was going to do an image transfer, so it being perfect was not an issue for me.  I cut if our once printed and figured out where on the page I wanted it.


I spread out some Golden Regular Gel (Matte) first then laid the printed image on top.  Smoothed it out with my fingers and waited simply 30 or so seconds and....


This is what I got.  I know it is not as dark as I would have liked, but I am okay with it.  Made me think of more ways to get to my desired affect.


I painted on black gesso with a smaller brush.  As I waited for it to dry, my roll of Easy Joint Tape was calling out to me, so of course I complied!  I adhered a few pieces down using Matte Medium.
 

I then scraped a bit of Super Heavy Gesso (White)  over the taped pieces so they would not stand out so much (as being tan/brown).


Next I pulled out my Fineline Applicator filled with White Fluid Acrylic and Airbrush Medium and scribbled across the 'shadow'.  I also. dripped random dots over the pages to add a little something.


One of the great things about taking photos along the way, allows you to see your work in a different eye....literally!  The eye of the camera can tell you a lot.  In this case, it told me I needed to extend the scribbles on the shoulders and arms. 


At first I was going to use my Fineliner that was filled with black, but seeing that the white scribbles had dimension, I figured I it would make the tip skip and I didn't want that.  So in turn, I used one of my black pens instead - Fude Ball (black).


Really enjoyed this one! Some of the more simplest ones are the most rewarding!  Then you have ones that should be easy, and turn in to the ones that cause you the most headaches....

like this one!

This was going to be the start of the Weekend Junket #12.  It was a cast off page that I really like and thought adding some 7 Gypsies ephemera would be really cool.  I placed it all down, roughed p the edges of all the ephemera, adhered them down using Matte Medium.


Added a few staples here and there...


Ya, it just wasn't working for me.

So when in doubt...add gesso (right?)!


This is how it stands right now.  I simply do not know what to do next (yet).  I have turned the page for now and will come back to it when the idea strikes!

So off for now to see if I can create something new and inspiring!

That Other Neutral Triptych

  That Other Neutral Triptych wrapped canvases 10x10x1.5" (x3) professional grade artist materials I worked on this smaller series at ...