Friday, September 29, 2017

Last one for the week - Collage!

Here they are - the final ones for the week, now quite sure what next week will bring - but will do my best to get on here a few times.  Have a busy weekend ahead of me but will do my best to carve some time out for art!

This first one for today was inspired by me wanting a simple black and white spread.  Once again, I will apologize for the lack of process pictures, but pretty sure by now, you can figure out my thought process on these pages.


As you can see, I was not able to leave it strictly as a B&W page, it needed that POP of color.  Not wanting the Washi Tape to be the focus, I did layer some more grey toned washi tape over top.  


For me, the focal point is the grouping of the Butterfly and the plant image - agreed?


Again, simple but very rewarding! 


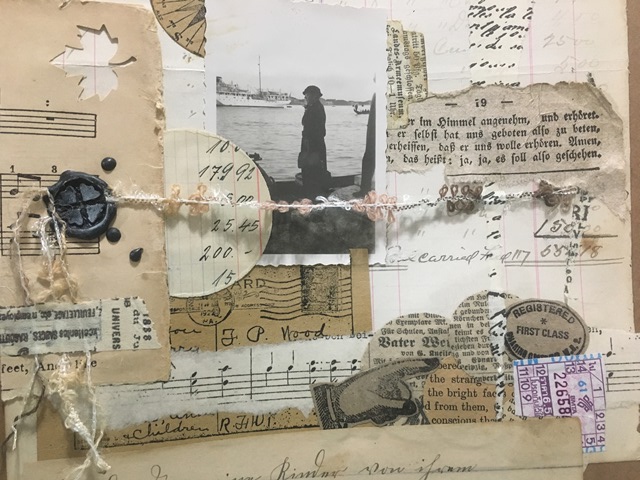
This next one took me a bit longer as you will see from how I started to how I finished.  Being that the previous one was B&W(ish), I thought it would be cool to try and do a 'kraft' one.  The base of the page is basically bits and pieces from an old Canvas Corp Sampler (Light Neutral) that has small samples of their papers and such. 


As I was adhering the layers the idea of using a large stamp popped in my head.  I have some Art Foamies kicking around that I really have not made use of yet - only because... I have no excuse! This one is HUGE! I believe is is about 10x4" and is called Leaf Vine.  As you can see, I stamped it using Ranger's Archival Ink - Tree Branch (obviously a fave).  The kraft paper I am layering here is one of my favorites - it is on the site here - and the photo does not do it justice...I really should update it.  It is a very light weight (thin) paper, similar to a grocery bag...with texture. I adore it for collage and scrapbooking alike simply due to it's affordability and weight for layering multiple times.


Thinking it needed something more (cream), I pulled out another sample from package and then added the remnants of some Jenni Bowlin Studio Perforated Sheet (Stamp) along with some cream burlap.  I tied a piece of hemp twine vertically around the strip and tied a knot.


I added a vintage button (that is a funny story that I may have to tell you about one day, or I might have if I look waaaaaaay back on my blog). The addition of the vintage photo is perfect as well, gives it the much need contrast and really pops.


You can see that I just can't leave it as a neutral page - I add the old 7 Gypsies Printed Tape - the cream and sage polka dots seemed fitting!  I played around with the placement of the tape and ended up as the last image.  Happy camper I am! 


Last one for today and this week. It was a blast to do and so enjoying the tones of it!

Here is my practice layers...kinda bland...


So thought I should pull out some of my vintage patterns and start using them! The page was adhered down using Collage Pauge then sealed the same way.


Now it was time to start layering again!  This time I am much happier...I think!  
TIPSTER - I've said it before and I'll say it again - take photos along the way.  It now only gives you perspective and a new view - it is great for those of us who like to upcycle and leverage their artwork and use it over and over again!


Time to start gluing it all down.  To these pieces, I simply used UHU glue.


These next two shots I am still playing around with the final placement of the top collage element.


You can see which one I finally end up with, now it was time for some ink splats!  I used FW Acrylics in Sepia.


I dab the ink splats with a rag so you are able to see them better and to get that staining effect.


This is also when I decided I should have inked my edges! So carefully (kinda), I start scraping the the inverted stamp pad along the edges and surfaces where I wanted it.


Now I am liking it much more!


Final page!


Thank you so much for following along this week!  I hope you have enjoyed my mini tuts and process pictures.  Maybe you've learnt a tip or trick along the way or at least been inspired enough to pull out your supplies and PLAY!


Don't forget to keep an eye on my Instagram and Facebook accounts (and I'd love it if you would follow along) as I tend to post there more often (just not as much detail)!

Most products are linked to my online store W2 Scrapbooking & Mixed Media Art Studio and if I don't carry it, I will often link to where you can find it.

until next time...

Wednesday, September 27, 2017

...and the Collage Continues!

Back again to day with another collage page - I am so enjoying these!  I come down in the morning and go through emails, then set aside what I can and head to the studio and do a quick page.  Make me feel like I am accomplishing something just for me on the creative side of my brain (not to say that the business side isn't creative as well), You know me, always looking, always researching and always reading up on what will be next.

So for today's quick one...let's get at 'er!

With my previous Canson Journal finally being full, I thought I would create a joural strictly for these vintage paper collages that I have been having so much fun working on.  I pulled out one from my stash (don't act surprised).  It is 8.5x11", has a kraft cover and cream pages and 24 sheets (48 pages).  I have decided only to create on one side of the inner pages, simply due to the knowing with the bulk of the layers, it won't handle 48.  

Of course I need to create a cover spread, just so I knew which journal to grab on the fly (hehehe).  So you can see I have my bin (okay, one of my bins) of Vintage Papers and such in front of me and ready to go.  I am using Strictly Collage Pauge for adhering on the cover as I want it all to be not only secure, but preserved.


Once again, you can see I laid out what I thought was going to be my cover.  The base sheet is a vintage ledger that I really didn't want to part with...but since I have more... 


I usually look back on the photos as I start to rebuild my page, but alas...I didn't this time around. Bummed as I really like this collage set up better than the final.  But as we all know, that is okay...I have the photo - so we can rebuild!


I am now starting to put it all back together now...


Thinking you have probably seen enough photos of the layering affect - let;'s just get to the good stuff.  You can see I added some more goodies - like this vintage photo that came in one of my recent Etsy finds. 


Here are a few close up - you can see all the bits and pieces that have been included. Goodies such as  punched vintage papers, torn vintage pages, washi tape,  along with the vintage fibers, music sheet and wax seal that was part of some packaging from my last Etsy find.


So love how this turn out, that I flipped open my book and started another right away...and apparently didn't take any process pictures!  But here is the low down...

Using the base of the printed tissue paper left over from an earlier collage, I adhere it down using Collage Pauge.  My next few layers are sized as follows: 7x6", 3.75x9.25", 4x5"and the strip going across is 1.75x8".  Note that there is a folded edge of about 1.5" which would take the strip down to  6.5".  I am always staggering and moving around the layers until I get it to where I am happy with balance and focus.

You can see I added yet another layer within the fold over which was simply a scrap that was on my desk left over from a previous page. I secured the fold with my Tim Holtz Tiny Attacher.


I added a rub on from an older Tim Holtz Remnants that is not being made anymore (sorry).  As you can see I wasn't overly concerned that it did not rub off as it should - TIPSTER...it's only a rub on, some of the best oops are pure gold!  Don't be afraid to use up odds and ends of your rub ons.  You can use them as the base of your page (ooo, there's an idea), simple accents or form your own layers of goodness on misc papers and tags!


Here is a shot of the final page - simple, but rather fun!


Thanks for stopping by! 

Don't forget to keep an eye on my Instagram and Facebook accounts (and I'd love it if you would follow along) as I tend to post there more often (just not as much detail)!

Most products are linked to my online store W2 Scrapbooking & Mixed Media Art Studio and if I don't carry it, I will often link to where you can find it.

until next time...

Tuesday, September 26, 2017

More Collage Inspirations...

If you have been following along on Instagram you will have seen a week of posts on Collage using my stashes of Vintage Papers.  I have been having a blast playing with these and have found them very inspiring and satisfying.  I can take ten minutes and bam...the page is done!  I don't feel guilty while I am creating and thinking I should be working on something else!


This next one was once again done in my Canson Mixed Media Journal (9x12").  I started with a base similar to the previous post - this one is a a full page sheet of a vintage ledger then I covered part of it with some printed tissue paper.  These were both applied using Collage Pauge.


Next comes a smaller book page is approx 4x6.75" and it is almost placed in the center of the page.


The music sheet is offset and measures approx 3.75x5.75" and I used some washi tapes that were included on the packaging on the shipment I had recently received.  I have once again inked some of the edges (not all) with Ranger's Archival Ink in Tree Branch.


This next piece is simply torn off part of the packaging and inked with Jet Black Archival Ink.


The entire page took me less than 10 minutes and I really like how it turned out and the simplicity of it all.


I did one more similar to the above, but just used a different theme and focal point this time around.

The base page is a vintage music sheet that was hand done.  Over top of it is a printed music sheet that I inked the edges with Tree Branch Archival Ink and is approximately 8x7" - this time I adhered using UHU glue as I was not suing a lot of layers.


I have a 3" band of Vellum packaging that goes across the bottom third of the page and added some additional collage ephemera to the already pretty piece.   

TIPSTER: Rule of Thirds! Use it in your layouts and in your journals, it will never steer you wrong...it gives you your focal point!

The vertical band on the left is two layers - the first being a remnant from some packaging and the second is a torn piece of  printed canvas Washi Sheet/Fabric Sticker from Love My Tapes.  Torn pieces of washi tape  and the extra added bonus of the string and wax seal made it awesome (okay, I may be a bit impartial).  Knowing it needed more - I looked around my table and came across the bag of Tim Holtz Botanical Layers and found the perfect additions of the floral element and Butterfly die cuts!


Love the pop of color I added, simply tying  in the blue from the base with this vintage ticket that I just folded over the edge and stapled on using my Tiny Attacher.


Here are a few close ups...


TIPSTER: Use what you have handy! This will often allow you to think beyond what has inspired you to begin with.  Using packaging, scraps and what many would think is trash can be an added plus to your next page!


Thanks for stopping by! 

Don't forget to keep an eye on my Instagram and Facebook accounts (and I'd love it if you would follow along) as I tend to post there more often (just not as much detail)!

Most products are linked to my online store W2 Scrapbooking & Mixed Media Art Studio and if I don't carry it, I will often link to where you can find it.

until next time...

That Other Neutral Triptych

  That Other Neutral Triptych wrapped canvases 10x10x1.5" (x3) professional grade artist materials I worked on this smaller series at ...